Building Your First Website
A Tutorial

This document was written using DiCMS v.0.6.1
Drop-In CMS was built because I couldn't find a CMS package that I could "drop in" to my already existing project to give it a front end. When I first approached the problem, I immediately went to the big boys, like WordPress. but what I found in every case is that the amount of effort that was needed was quite a bit. Users had to be integrated into the system, and the system itself had things that I didn't want to have to do. For example, every single CMS that I looked into had its own user system and permission system. It was made to serve as the primary project, not as an add-on to an existing project.
Furthermore, I'm not really a web designer; I'm a web developer. I'm not actually good at making webpages look nice, or how to design an efficient layout. Instead I go out and find website templates and adapt them to my needs. It turns out, most of the professional web site building tools out there are are mainly for professionals though. For people that can build websites out of thin air, like graphic designers. I just needed something that I could slap on the front of my project, grab a quick template from somewhere and add pages that were cookie-cutter stuff. Maybe a blog, too.
But pretty much everything that I looked into required a lot of code to tie together, or to use their permissions systems, or their user system. I decided that I wanted a system with the following features:
- Easy to drop it into an existing Laravel installation (preferably through composer)
- Easy to copy and paste from a template
- Easy to add as many pages as you want/need
- Extensible so that I can add stuff to it later
- Maybe a blog
I'm at the point of development where most of this is true, so I wanted to start documenting some of the capabilities. In this first blog post, I will go over installation of DiCMS (and only DiCMS, not the Blogger Plugin) and show how to set up a simple site.
Prep Work

First we prepare a few things. We need a place to install it to, as this is not a self-contained project. It's meant to be used in an existing project. So first you should have that project. This is a Laravel package, so your environment should be in Laravel. You can either create a project form scratch, or add it to your existing project.
Next, we need a website template. Since this was created primarily for people who would like to throw together a site really fast, it usually starts with a template. There are a few places you can go; I used to be a big fan of Open Source Web Design, but it has stagnated quite a bit. I'm a fan of bootstrap, so lately I've been using their Bootstrap Themes to get templates. The template I'm currently using is their Clean Blog, which is what I'll be using in this tutorial.
Installation
Now that we have both our existing project and the downloaded template above (which should be extracted out to a folder named startbootstrap-clean-blog-gh-pages), we're ready to start the installation. The installation is detailed in the README at the GitHub project, but I'll go over it here again. Go into the folder of the existing project and install DiCMS.
composer require halestar/laravel-drop-in-cmsNext, we publish the config file and the migration files by executing:
php artisan vendor:publish --tag=dicmsAnd we run the migrations:
php artisan migrateWe will be talking about Policies in a later tutorial, so we will skip publishing policies for now. We will also not be installing the Blogger plugin, which will also be covered in a later tutorial. However, we still need to link DiCMS with your project. There are two different areas that DiCMS provides, the Frontend, which will be where your fully completed website will appear, and the Admin, which is where you'll actually build the webpage. This is taken care of by including two functions in your routes file: DiCMS::adminRoutes() and DiCMS::publicRoutes().
The DiCMS::adminRoutes() function, which is called from the main DiCMS object located in \halestar\LaravelDropInCms\DiCMS, registers a bunch of routes that will be used in the admin part of your website. This function will simply register the routes with no middleware (other than the provided one needed to work with the system) or under any prefix route, it is your responsibility to safeguard and put this route somewhere appropriate in your web infrastructure. This means that, at the least, these routes should be behind some sort of user authentication and not in the root path of your project. Now, Laravel has the great auth middleware that can be used to protect any route (or routes) from unauthenticated users, and you can also the use the Route::name() and Route::prefix() options to give a group of routes a route name prefix, or a URL prefix. We can combine all these to give some basic protection to the Admin side.
/**
 * This will create all the routes for the admin sites with a prefix of /admin to the URL and the prefix admin. to all the
 * names of the routes and it will only allow authenticated users. ie:
 * List all sites: www.yourproject.org/admin/sites action: admin.dicms.admin.sites.index
 */
Route::prefix('admin')->name('admin.')->middleware('auth')->group(function()
    {
        \halestar\LaravelDropInCms\DiCMS::adminRoutes();
    });

/**
 * This will create all the routes for the admin sites with a prefix of /cms to the URL and the prefix admin. to all the
 * names of the routes and it will only allow authenticated users. ie:
 * List all sites: www.yourproject.org/cms/sites action: cms.dicms.admin.sites.index
 */
Route::prefix('cms')->name('cms.')->middleware('auth')->group(function()
    {
        \halestar\LaravelDropInCms\DiCMS::adminRoutes();
    });

/**
 * This will create all the routes for the admin sites with a prefix of /cms to the URL, and it will only allow authenticated users. ie:
 * List all sites: www.yourproject.org/cms/sites action: dicms.admin.sites.index
 */
Route::prefix('cms')->middleware('auth')->group(function()
    {
        \halestar\LaravelDropInCms\DiCMS::adminRoutes();
    });
Depending on what you're using for your permissions, you can also do some basic permissions-access to the admin side. For example, if you use Spatie's Laravel Permissions (a great package), you can safeguard your route by doing:
/**
 * This will create all the routes for the admin sites with a prefix of /cms to the URL, and it will only allow authenticated users,
 * and that user will need to have the cms permission. ie:
 * List all sites: www.yourproject.org/cms/sites action: dicms.admin.sites.index
 */
Route::prefix('cms')->middleware(['auth','can:cms'])->group(function()
    {
        \halestar\LaravelDropInCms\DiCMS::adminRoutes();
    });
The DiCMS::publicRoutes()function registers the routes needed for the front end of your project. You will most likely want this to be at the root of project, so that when client goes to www.yourproject.org, they will see the home page that you defined in the admin side of things. However, there are no limitations of where you would like to put the "front" of the site, other than available routes. You could make this website accessible only through www.yourproject.org/intranet for example, for which that "front" will only be available to authenticated users. You do this by doing the same as above, only with this function instead:
/**
 * This will put your website front on the root of your site.
 * i.e.: www.yourprojet.org/
 */
\halestar\LaravelDropInCms\DiCMS::publicRoutes();

/**
 * This will put your website under the url "intranet" and make it so that only authenticated users can use it.
 * i.e.: www.yourproject.org/intranet
 */
Route::prefix('intranet')->middleware('auth')->group(function()
    {
        \halestar\LaravelDropInCms\DiCMS::publicRoutes();
    });
Next, we will need to verify that the configuration is ok. Open up the config/dicms.php to see the default configuration
return
[
   'table_prefix' => env('DICMS_TABLE_PREFIX', 'dicms_'),
   'media_upload_disk' => env('DICMS_MEDIA_UPLOAD_DISK', 'public'),
   'thumb_folder' => env('DICMS_IMAGE_THUMB_FOLDER', '.thmb'),
   'thumb_max_height' => env('DICMS_IMAGE_THUMB_MAX_HEIGHT', 64),
   'img_max_height' => env('DICMS_IMAGE_MAX_HEIGHT', 768),
   'datetime_format' => env('DICMS_DT_FORMAT', 'm/d/Y h:i A'),
   'date_format' => env('DICMS_DATE_FORMAT', 'm/d/Y'),
   'back_to_url' => env('DICMS_BACK_TO_URL', '/'),
   'settings_class' => env('DICMS_SETTINGS_CLASS', \halestar\LaravelDropInCms\Models\DiCmsDbSetting::class),
   'policies' =>
   [
       \halestar\LaravelDropInCms\Models\Site::class => env('DICMS_SITE_POLICY', \halestar\LaravelDropInCms\Policies\SitePolicy::class),
       \halestar\LaravelDropInCms\Models\Header::class => env('DICMS_HEADER_POLICY', \halestar\LaravelDropInCms\Policies\HeaderPolicy::class),
       \halestar\LaravelDropInCms\Models\Footer::class => env('DICMS_FOOTER_POLICY', \halestar\LaravelDropInCms\Policies\FooterPolicy::class),
       \halestar\LaravelDropInCms\Models\CssSheet::class => env('DICMS_CSS_SHEET_POLICY', \halestar\LaravelDropInCms\Policies\CssSheetPolicy::class),
       \halestar\LaravelDropInCms\Models\JsScript::class => env('DICMS_JS_SCRIPT_POLICY', \halestar\LaravelDropInCms\Policies\JsScriptPolicy::class),
       \halestar\LaravelDropInCms\Models\Page::class => env('DICMS_PAGE_POLICY', \halestar\LaravelDropInCms\Policies\PagePolicy::class),
       \halestar\LaravelDropInCms\Models\DataItem::class => env('DICMS_DATA_ITEMS_POLICY', \halestar\LaravelDropInCms\Policies\DataItemPolicy::class),
   ],
   'plugins' => []
];
You can either make the changes here, or add the corresponding entry to your .env file. You can use this as-is and it will work right out of the box, but here is an explanation of the config options:
table_prefix (DICMS_TABLE_PREFIX) - The prefix of the table to mark all dicms tables with.
media_upload_disk (DICMS_MEDIA_UPLOAD_DISK) - The disk where all the media will be uploaded. It must be web-accessible, as all the images will be served in your public site.
thumb_folder (DICMS_IMAGE_THUMB_FOLDER) - Name of the folder where thumbnails of all the assets will be stored.
thumb_max_height (DICMS_IMAGE_THUMB_MAX_HEIGHT) - The max height in pixels that the thumbnails should be.
img_max_height (DICMS_IMAGE_MAX_HEIGHT) - The max height in pixels that all the images uploaded will be resized to.
datetime_format (DICMS_DT_FORMAT) - What date format should be used when displaying a date with time.
date_format (DICMS_DATE_FORMAT) - What date format should be used when displaying a simple date.
back_to_url (DICMS_BACK_TO_URL) - When clicking the name of your app in the admin interface, what URL should it take you to?
settings_class (DICMS_SETTINGS_CLASS) - The class that you would like to use to store DiCMS settings. As of now, it stores them to a table in the database. You can change where all the settings are stored by implementing the halestar\LaravelDropInCms\Interfaces\DiCmsSetting interface and writing your own logic for it.
The policies settings can be left alone until we go over Policies.
Once all those steps are followed you can go to the URL where you installed the front end, i.e. www.yourproject.org, and you should be greeted with this banner:

Congratulations! You have just successfully installed DiCMS!
Creating a New Site
Now we're ready to start creating our first site! Click on the button "Start Creating" to head over to the admin side. Now, if you did this securely, you will be prompted to login to your project before your continue. Once you are properly authenticated and authorized, you will get to the "Create New Site" page.
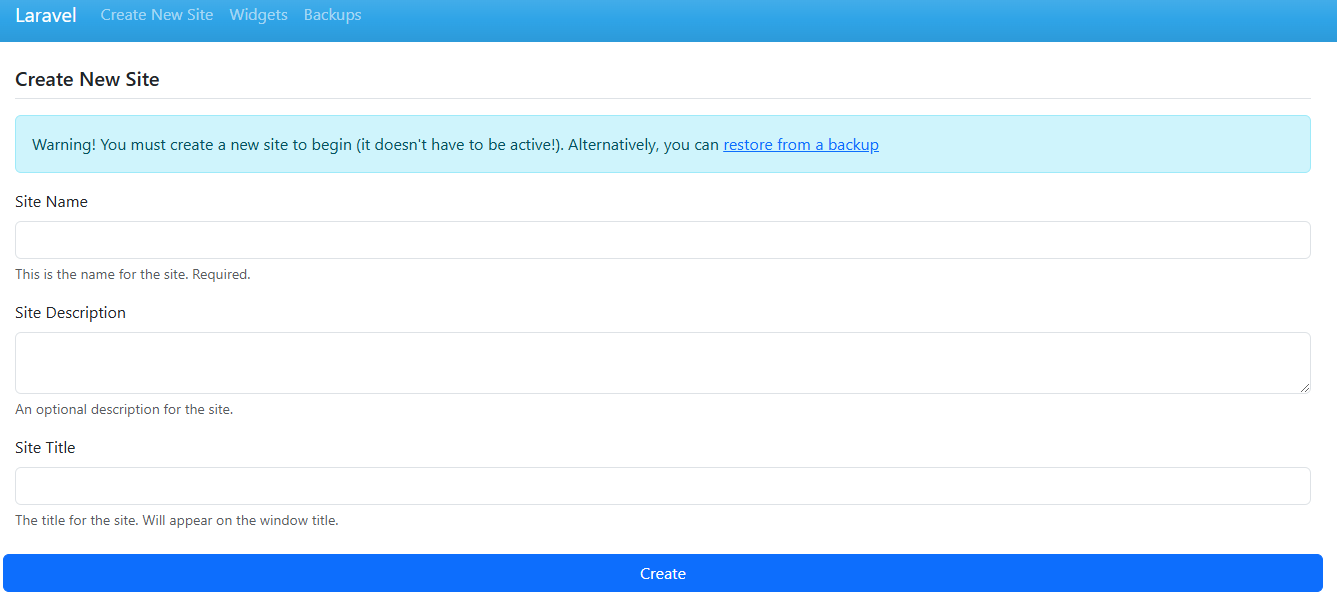
Since you don't have a site yet created you are forced to create a new site, unless you have a backup file from a previous installation, in which case you can head over to the Backup section. For the purpose of this tutorial, we will creating a new site from scratch (well, from a template), so add your site's name, description and title. While only the name is required to create a new site, it is highly encouraged to enter a description and a title, as they will be used in the site's metadata. For this tutorial I will be entering DiCMS for all the values. Hitting the create button will take you to the main control room of your new site.
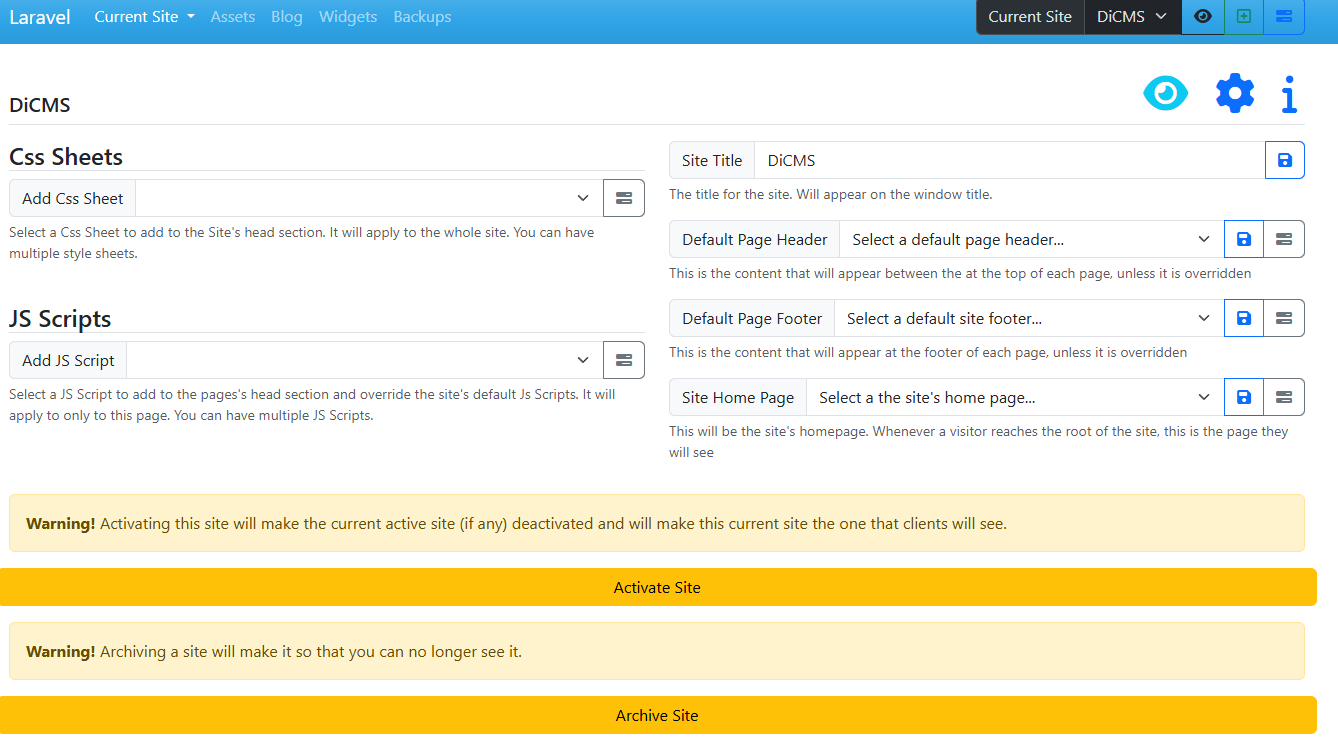
You can see here that there is nothing yet defined. No defaults or homepages, no scripts and the site is not active yet. In fact if you go to the front page, you will still be seeing the same page as when you first installed the project. We can make this active, but with no information, it will simply throw an error. Lets go over some some of the elements of your site.
CSS Sheets - This section lists all the Cascading Style Sheets attached to this site. These are included in every page of the website and they should define the overall "look" of your site.
JS Scripts - This section lists all the Javascript Scripts that this site uses. Like the CSS Sheets, they are included in every page of the website.
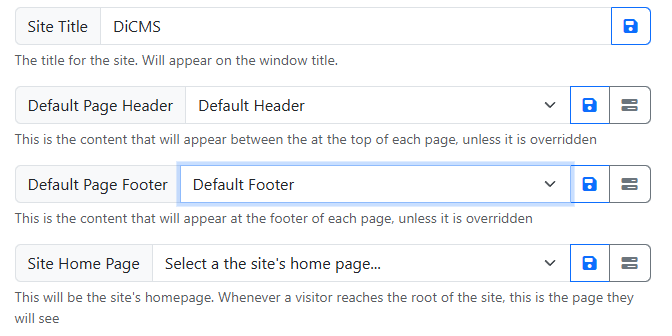
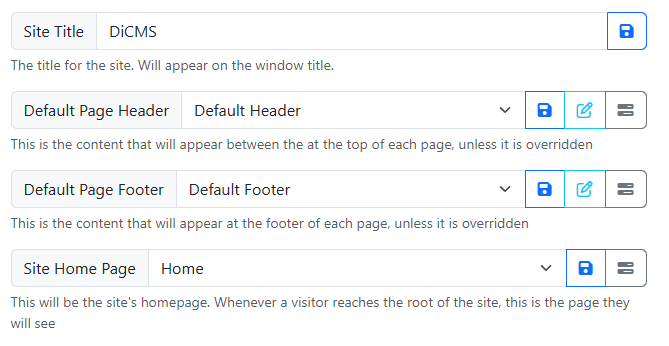
Site Title - Same as the one we entered in the site creation page. This is shown in the title of the window or tab that has your project open.
Page Header - Page headers are HTML code that can be placed at the top of every page. You can define these headers in the Headers Section, which we will go over later, but in the default section, you can define a page header that should appear in every page of the site, unless it is overridden in a specific webpage.
Page Footer - Similar to Page Headers, but for Footers instead, which are located at the very bottom of every page. Useful when adding copyright notices or site menus. You can define these footers in the Footers Section, which we will go over later, but in the default section, you can define a page footer that should appear in every page of the site, unless it is overridden in a specific webpage.
Page - This is the page in your site that serves up content. There are no pages currently created, so there's nothing yet to see. However if you had at least one page, then you can select it as the site's home page, which will be the page served at the root of your website.
Activate Site - Activates the site and make it "live", letting people see your website. You should not push this until you're ready to have your users see your content.
 - Clicking on this icon will show you a preview of you current site.
![]() - Clicking this icon will take you to the site's settings, which include things like BODY tags, favicons and content wrappers.
- Clicking this icon will take you to the site's settings, which include things like BODY tags, favicons and content wrappers.
![]() - Clicking on this icon will take you to the site's metadata settings, which is used to define all the metadata for the site.
- Clicking on this icon will take you to the site's metadata settings, which is used to define all the metadata for the site.
We have a template to build from, so let's start using it! We will be going over all the features of the system as we copy the template over.
The Asset Manager
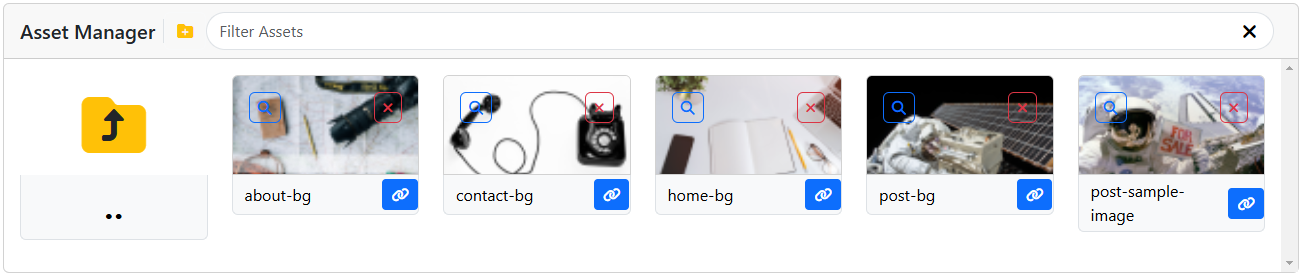
The Asset Manager is the way that we can upload images to the server in order to be used in the website. It can be access through the menu at the top labeled "Assets" and it will open into a widget that looks like this:

It's currently empty, of course, but we can fix this by uploading some images. Luckily, the design that we downloaded has some images to use. They're located in the assets folder and contain a file favicon.ico and a folder labeled img; the folder contains 5 images: post-bg.jpg, post-sample-image.jpg, about-bg.jpg, contact-bg.jpg, home-bg.jpg. First, we upload the favicon.ico file by dragging it and dropping it into the assets area. We create the folder by clicking on the ![]() icon. You can change the name of the folder (or any other item) by clicking on the name field of the item, changing the name, then clicking the green checkmark.
icon. You can change the name of the folder (or any other item) by clicking on the name field of the item, changing the name, then clicking the green checkmark.

You can go into the img folder by double-clicking it, you can then upload all the remaining images.
WARNING! Just because they're on a folder and the name is set, that it not how it is stored in the server. If you would like to know the url of the file, click on the blue link icon next to the name to copy the URL of the file.
From here on, on every page that might need access to images will have a have a an icon ![]() on the left hand side of the window that will open to a mini-asset manager, where you can click on images to add them to your page, or click the link icon to get the URL of the image.
on the left hand side of the window that will open to a mini-asset manager, where you can click on images to add them to your page, or click the link icon to get the URL of the image.
CSS Sheets
CSS Sheets can be access from the "Current Site" menu under "Css Sheets". It will display an empty roster of sheets.

Create a new one by clicking the blue plus button.
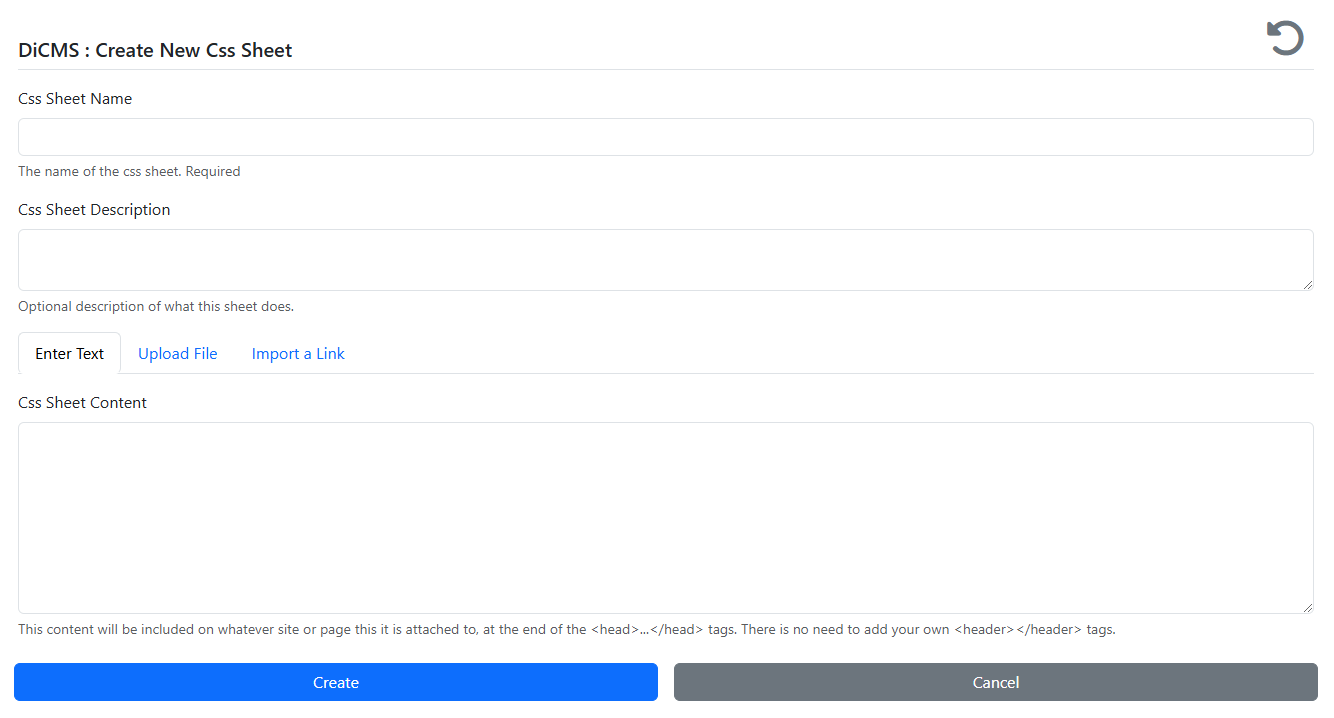
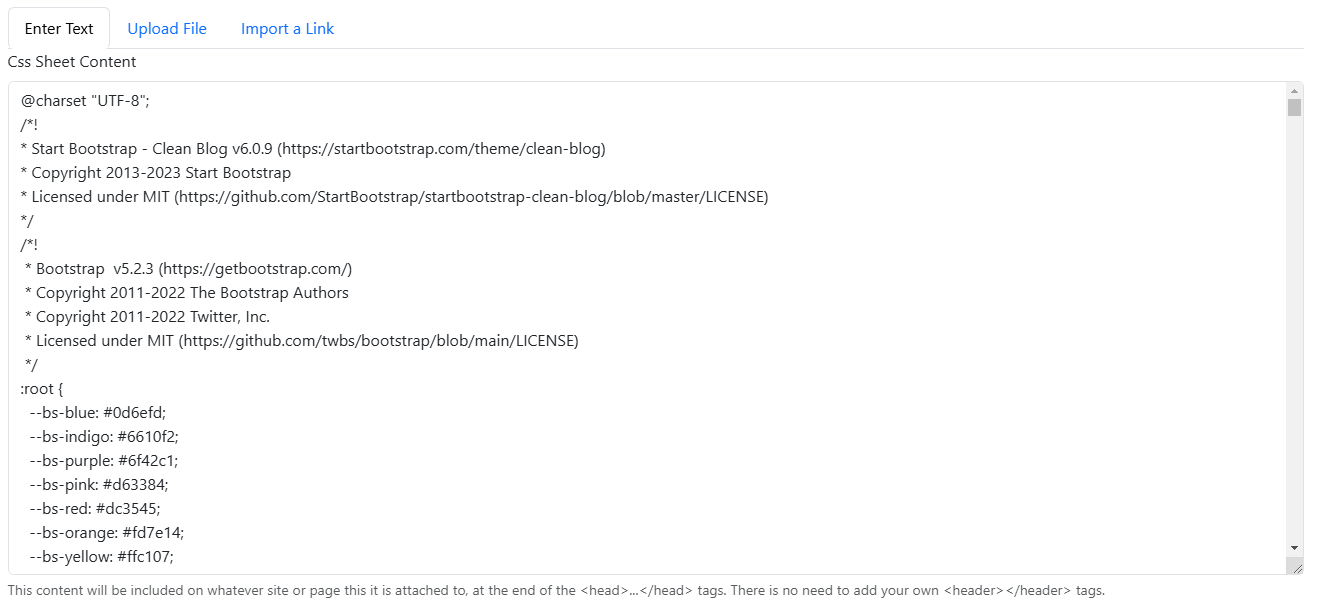
The name of the CSS sheet is required, but the description is not (although it is sometimes nice to have), the last part is three options, at least one is required. Let's go over them.
Enter Text - Easiest option, you type your own CSS commands. Or copy and paste them.
Upload a File - If you template provides you a file, you can upload it here.
Import a Link - This allows you to import a link, usually from a CDN. Enter the URL to import it from and the attributes that you would like to use, if any. Attributes are attached to the script declaration, and are sometimes needed by the library you're importing, Example of attributes I've seen are async and type='text/css'.
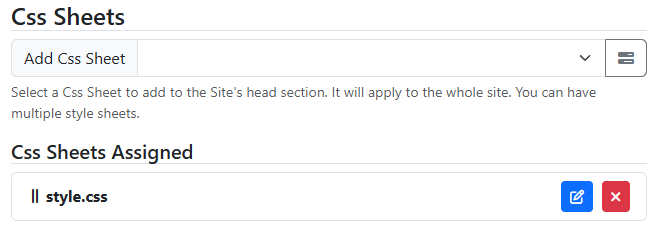
In our case, our template provides a style.css sheet to use, so let's upload it.
We now have our first style sheet! We can delete it by clicking the red trash icon, duplicate it by clicking the yellow dupe icon, and edit it by clicking the blue edit icon. Go ahead and click edit.
There is no uploaded file! Instead, the system extracted it into text saves it as such. This way you can edit the file directly if you want to make changes to the existing code. Here you should also look for any URL's that are hardcoded in. They might refer to the assets that you've uploaded, which are now stored under a different name.
Let's go back to the current site. You can do this by clicking on the eye icon in your sites menu in the upper right hand corner. ![]()
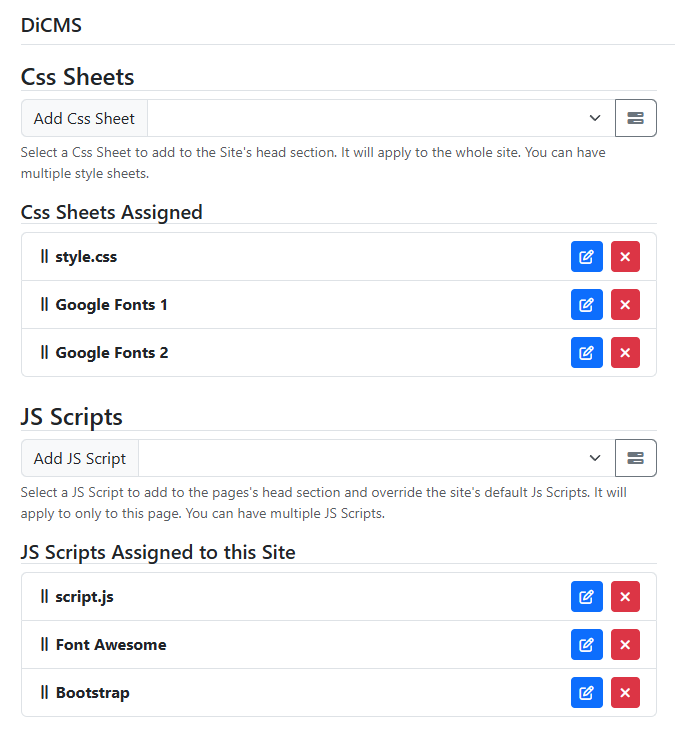
Here, you will notice that under the Css Sheets dropdown, there is now an option for the new sheet you added. Select this sheet and it will be added to the site and it will be in every page that is loaded, unless overridden.
JS Scripts
JavaScript Scripts work the same as CSS Sheets. You can access them by clicking on the "JS Scripts" submenu under the "Current Site" menu.

Create a new one by clicking on the blue plus icon.
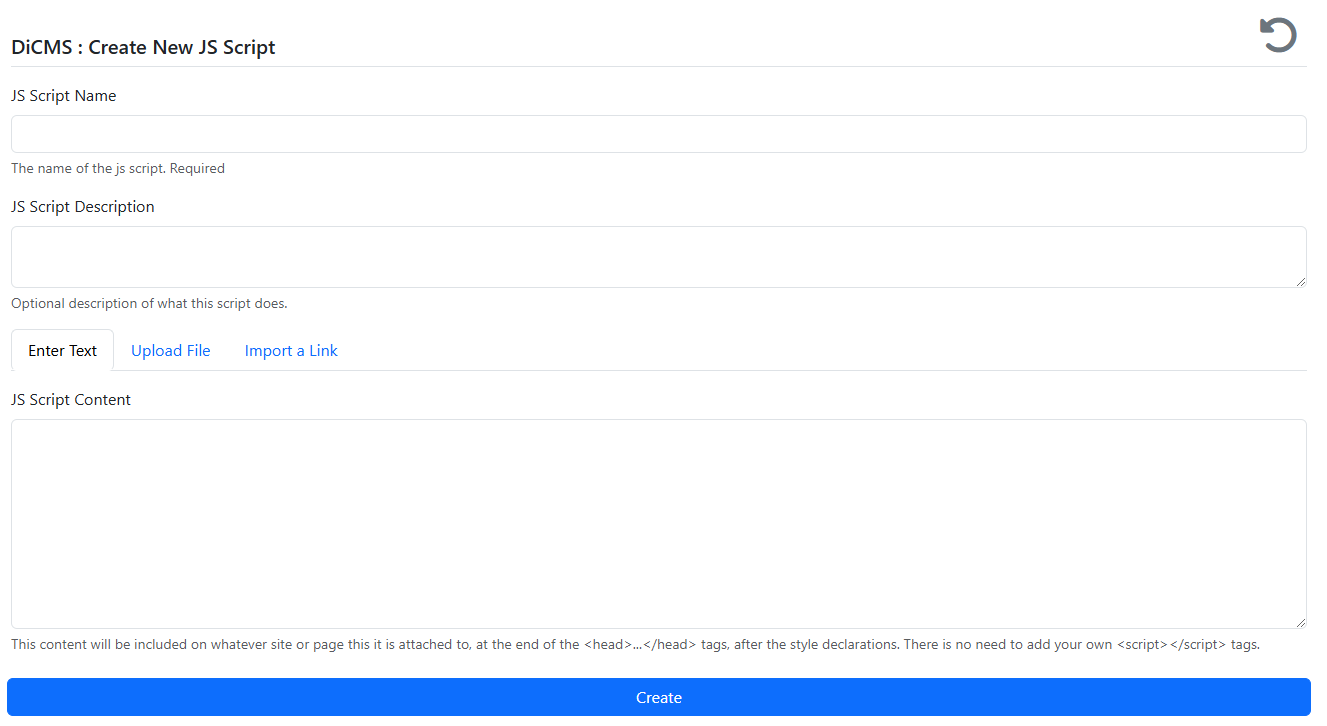
Since our template also has a scripts.js file, upload it and add it to the site, in the same way that you did with the CSS script.

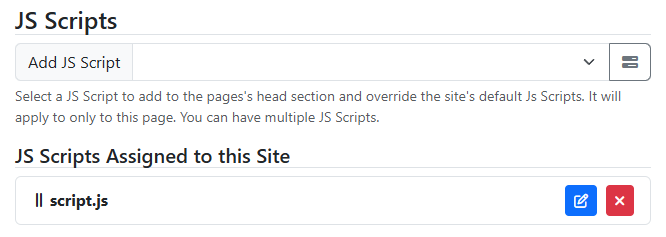
We now have all CSS styles and scripts that we need. Or do we?
Looking at the Header Data
If you know anything about HTML, you know that the design happens between the <body></body> tags, and the configuration, metadata and other important stuff is put in between the <head></head> tags. Well, this template probably has some stuff there too! We can look at the contents by opening the index.html file in our favorite text editor and seeing what's in between the <head></head> tags.
<head>
    <meta charset="utf-8" />
    <meta name="viewport" content="width=device-width, initial-scale=1, shrink-to-fit=no" />
    <meta name="description" content="" />
    <meta name="author" content="" />
    <title>Clean Blog - Start Bootstrap Theme</title>
    <link rel="icon" type="image/x-icon" href="assets/favicon.ico" />
    <!-- Font Awesome icons (free version)-->
    <script src="https://use.fontawesome.com/releases/v6.3.0/js/all.js" crossorigin="anonymous"></script>
    <!-- Google fonts-->
    <link href="https://fonts.googleapis.com/css?family=Lora:400,700,400italic,700italic" rel="stylesheet" type="text/css" />
    <link href="https://fonts.googleapis.com/css?family=Open+Sans:300italic,400italic,600italic,700italic,800italic,400,300,600,700,800" rel="stylesheet" type="text/css" />
    <!-- Core theme CSS (includes Bootstrap)-->
    <link href="css/styles.css" rel="stylesheet" />
</head>
A lot more stuff there! Ignoring the title, which we already took care of when we created the site there are a lot more declarations in here. The declarations can be divided into three distinct groups:
CSS Links
These are links to the css files that the site needs. One is to the one we're alreay using when we uploaded the styles.css file, but there are a few more:
<!-- Google fonts-->
<link href="https://fonts.googleapis.com/css?family=Lora:400,700,400italic,700italic" rel="stylesheet" type="text/css" />
<link href="https://fonts.googleapis.com/css?family=Open+Sans:300italic,400italic,600italic,700italic,800italic,400,300,600,700,800" rel="stylesheet" type="text/css" />
JS Links
There is one extra link to a JS script to use Font Awesome (which I highly recommend).
<!-- Font Awesome icons (free version)-->
<script src="https://use.fontawesome.com/releases/v6.3.0/js/all.js" crossorigin="anonymous"></script>
There is also some at the bottom.
<!-- Bootstrap core JS-->
<script src="https://cdn.jsdelivr.net/npm/bootstrap@5.2.3/dist/js/bootstrap.bundle.min.js"></script>
Metadata
There is some metadata information as well. Some of it empty.
<meta charset="utf-8" />
<meta name="viewport" content="width=device-width, initial-scale=1, shrink-to-fit=no" />
<meta name="description" content="" />
<meta name="author" content="" />
There is also a loose item that I did not mention, the favicon.ico declaration
<link rel="icon" type="image/x-icon" href="assets/favicon.ico" />The Script and Sheets can be all be done by adding another two sheets in the Css Sheets section and two in the Js Script sections. They will be of type "Import a Link" and should look like this:
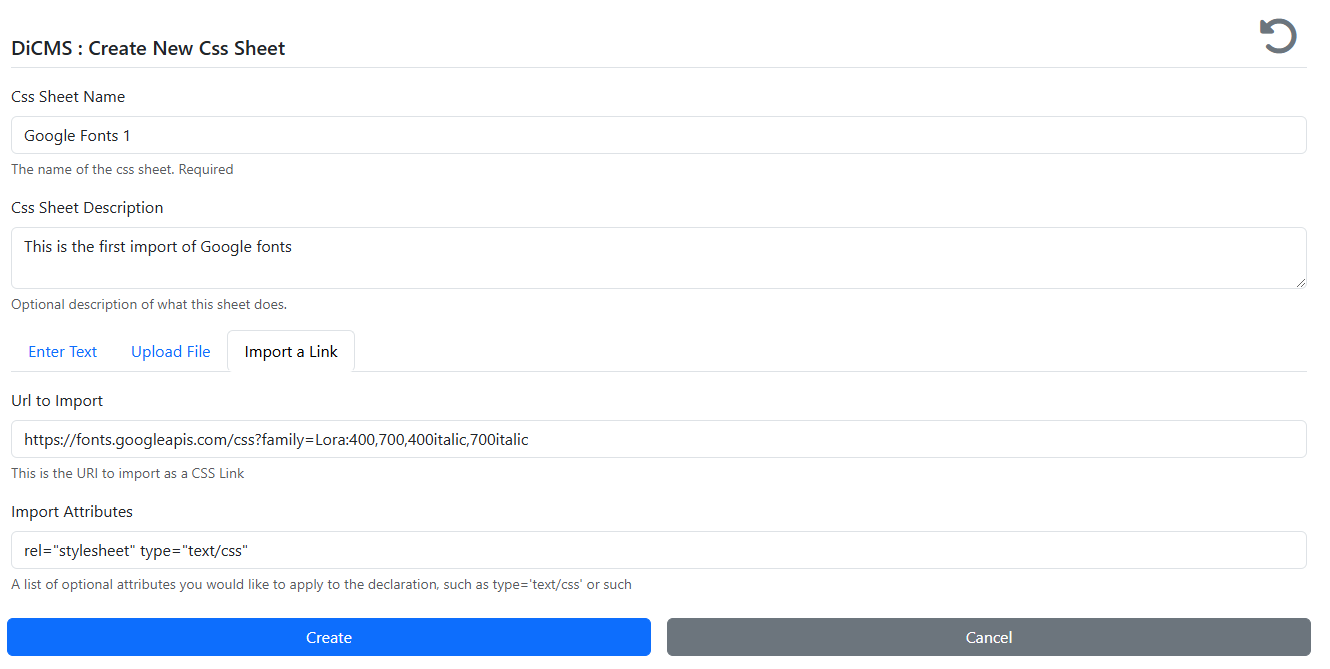
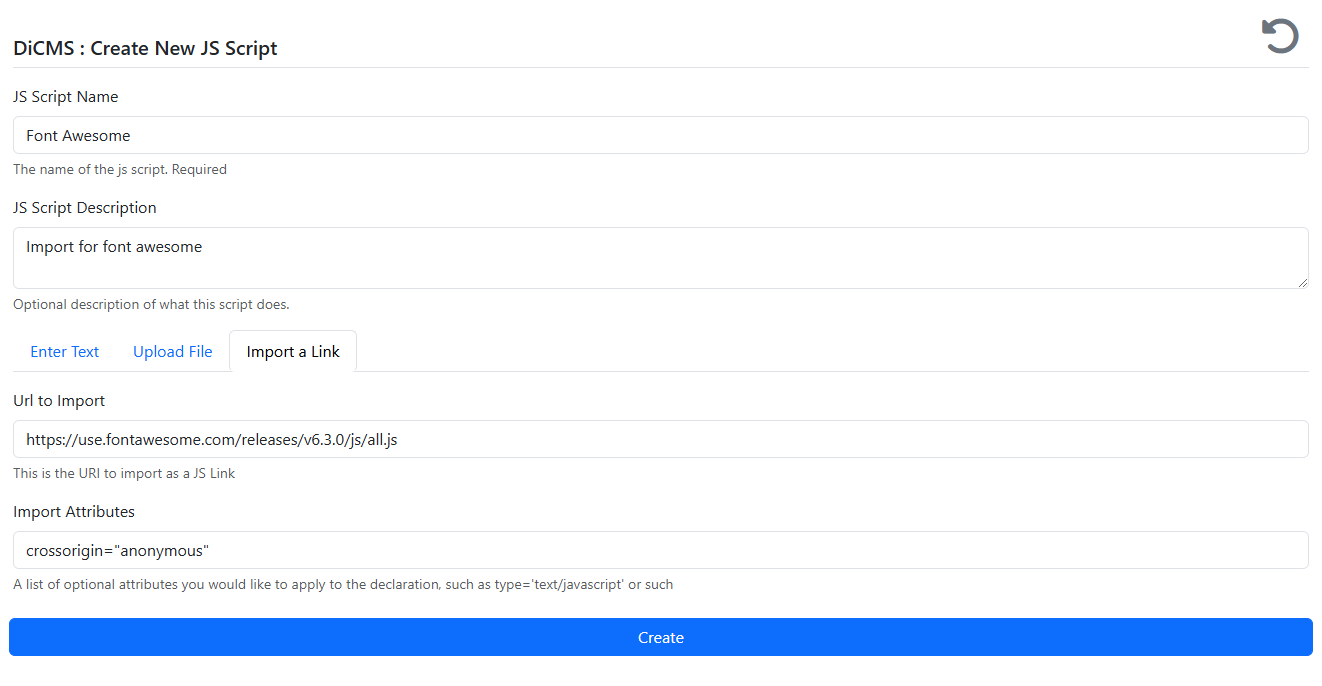
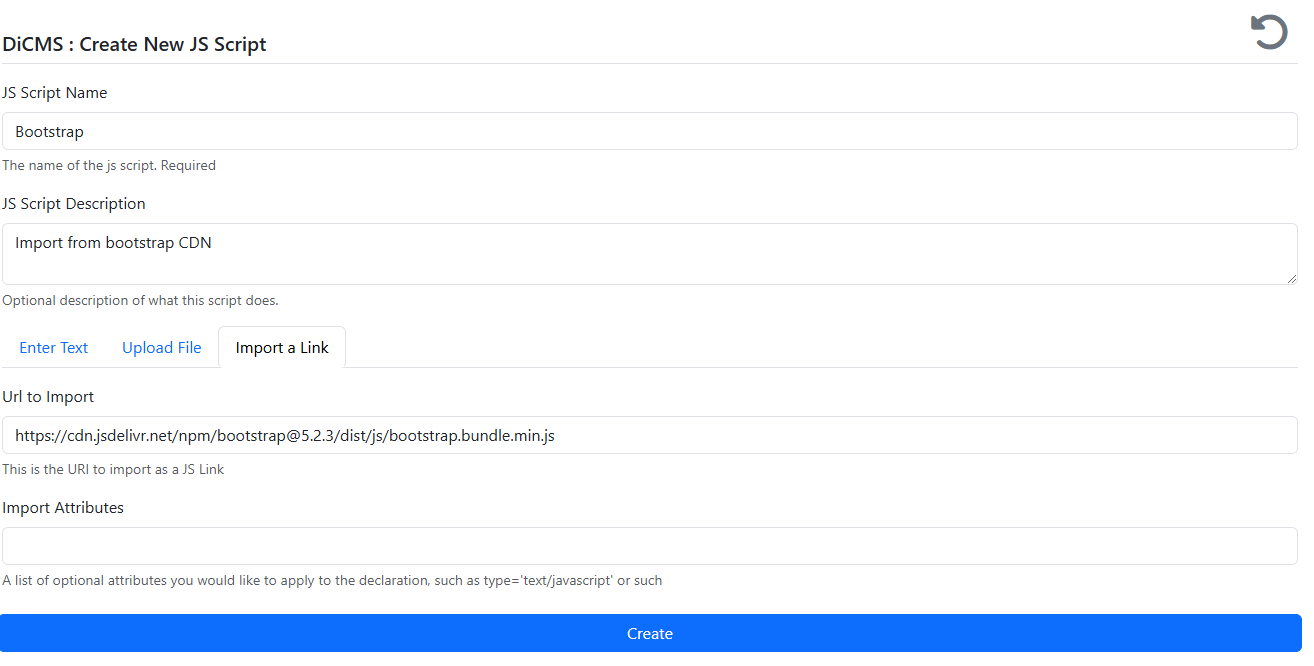
And then add them to the site.
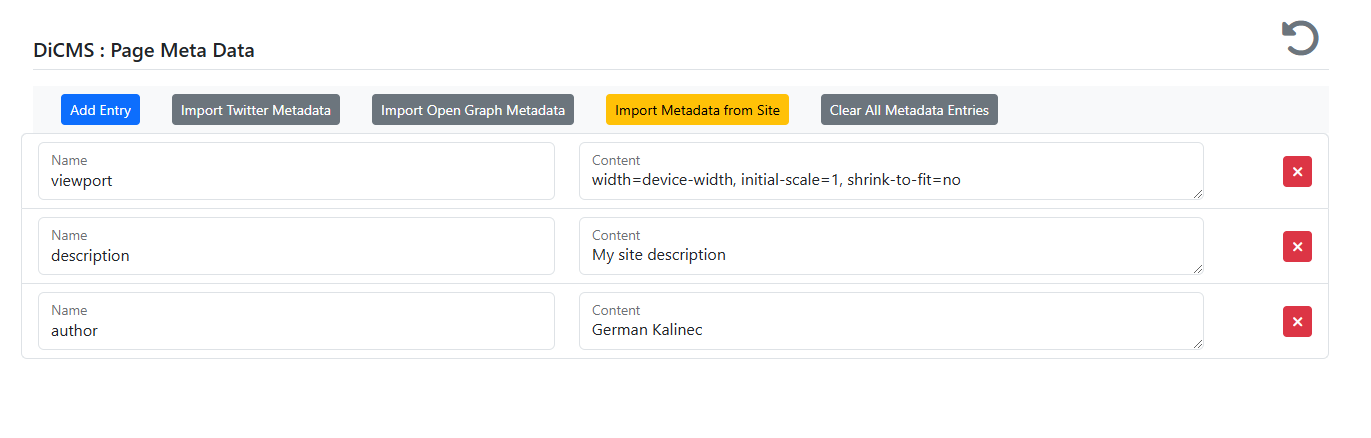
Next is the Metadata. We can do this by going back to the Site View and clicking on the ![]() icon. This will take you to the metadata manager.
icon. This will take you to the metadata manager.

From here we can add all the entries manually by clicking Add Entry and entering the appropriate information. You do not have to enter the <meta charset="utf-8" /> meta, as that is part of the HTML standard now and it will be automatically added.
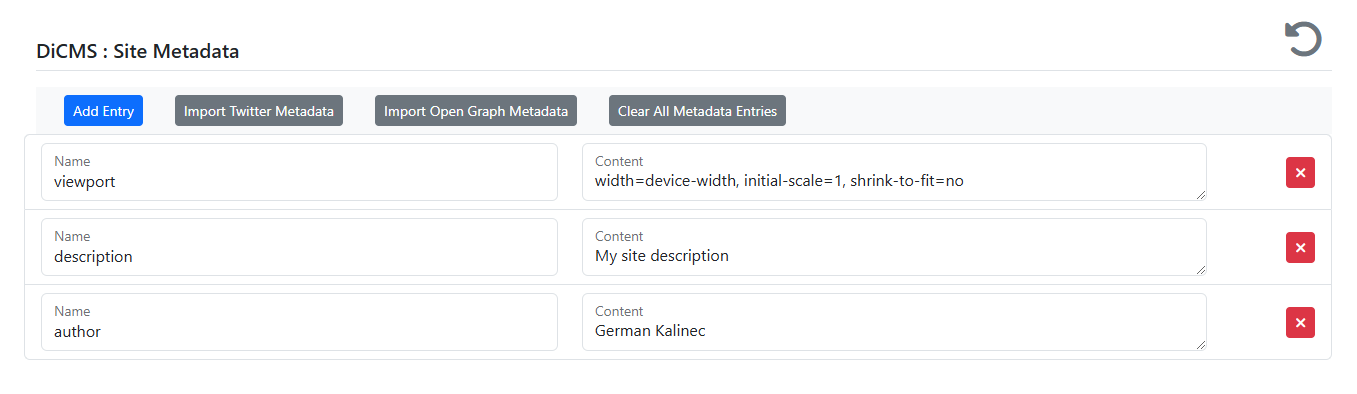
We will not be going over the Open Graph or Twitter metadata, as that is outside the scope of this tutorial.
But what about the favicon? That last element is special and can be taken care in the Site Settings, which can be accessed from the View Site page by clicking on the ![]() icon.
icon.
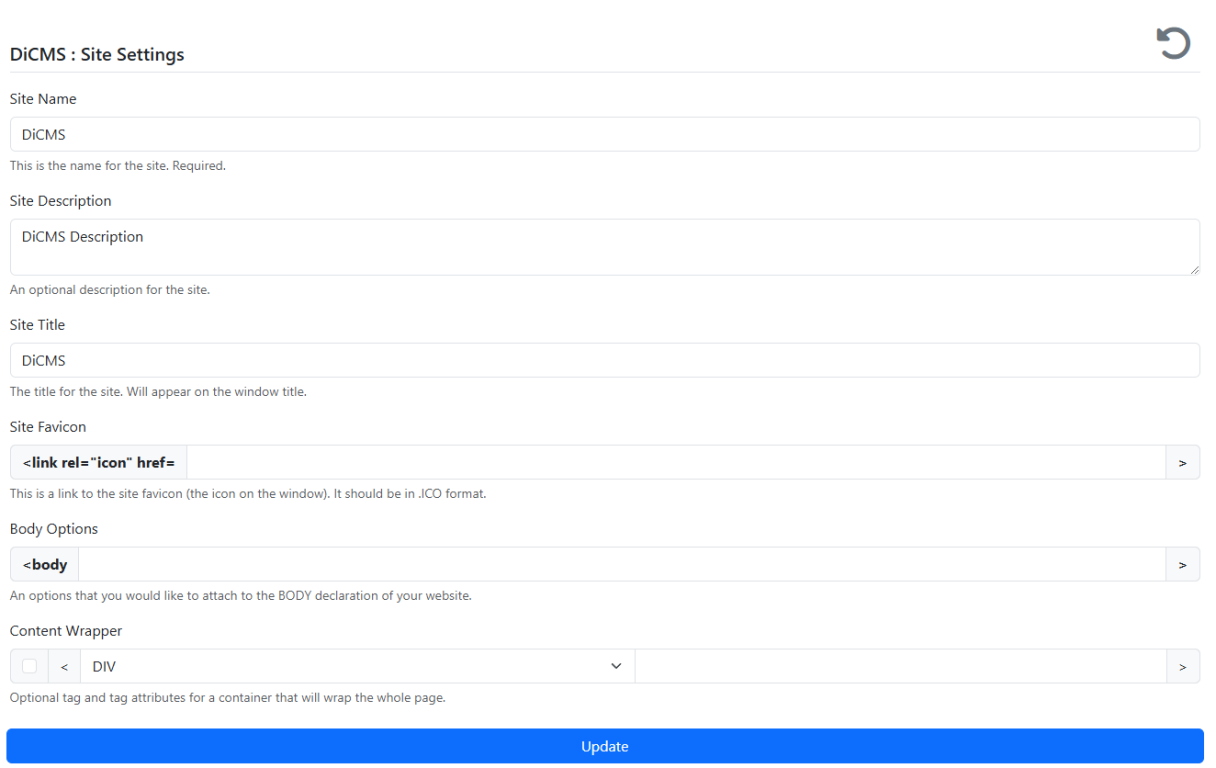
As you can see there is a section to paste the URL for the icon. Do not, however just paste what was on the index page! That is not the correct path to the image. Instead, click on the ![]() button on the right hand side and click the blue link icon on the favicon.ico and paste it in. This will be the correct URL, which is a hashed version of the file you've uploaded to the disk that you've configured in the config section. In my case, for example, my favicon URL is
button on the right hand side and click the blue link icon on the favicon.ico and paste it in. This will be the correct URL, which is a hashed version of the file you've uploaded to the disk that you've configured in the config section. In my case, for example, my favicon URL is https://dev.kalinec.net/storage/cms/qwo7N9rHAFb0JiCJPvavXYzHn2Vz9T0F5ap8I4GV.ico. This specific template has nothing in the body tags, but you could set a different body color by adding something like style="background-color: #fff" to the body tag. There is also no "wrapper" for the content, so we will not be needing the last option, but it is there if you wish to wrap all the content: header, page and footer, inside a single element. This element can be a DIV, SECTION, MAIN, or APP.
Headers and Footers
Headers and Footers work in exactly the same way, they simply show up in different locations on the front page. Headers show up at the top of the page, while footers show up at the bottom; the "page" is what shows up in the middle. Now it should be noted that you can just as easily not have any headers or footers and just build one page, duplicate them and then change the content of the other one. This is a very valid strategy that I use in certain pages for this website. The reason that you may want to separate the headers and footers is to keep your site the same across pages.
Since headers and footers work the same way, we will simply go over the headers for right now. Looking at our sample website, we can see a header that looks like this:
<nav class="navbar navbar-expand-lg navbar-light" id="mainNav">
	<div class="container px-4 px-lg-5">
		<a class="navbar-brand" href="index.html">Start Bootstrap</a>
		<button class="navbar-toggler" type="button" data-bs-toggle="collapse" data-bs-target="#navbarResponsive" aria-controls="navbarResponsive" aria-expanded="false" aria-label="Toggle navigation">
			Menu
			<i class="fas fa-bars"></i>
		</button>
		<div class="collapse navbar-collapse" id="navbarResponsive">
			<ul class="navbar-nav ms-auto py-4 py-lg-0">
				<li class="nav-item"><a class="nav-link px-lg-3 py-3 py-lg-4" href="index.html">Home</a></li>
				<li class="nav-item"><a class="nav-link px-lg-3 py-3 py-lg-4" href="about.html">About</a></li>
				<li class="nav-item"><a class="nav-link px-lg-3 py-3 py-lg-4" href="post.html">Sample Post</a></li>
				<li class="nav-item"><a class="nav-link px-lg-3 py-3 py-lg-4" href="contact.html">Contact</a></li>
			</ul>
		</div>
	</div>
</nav>
<header class="masthead" style="background-image: url('assets/img/home-bg.jpg')">
	<div class="container position-relative px-4 px-lg-5">
		<div class="row gx-4 gx-lg-5 justify-content-center">
			<div class="col-md-10 col-lg-8 col-xl-7">
				<div class="site-heading">
					<h1>Clean Blog</h1>
					<span class="subheading">A Blog Theme by Start Bootstrap</span>
				</div>
			</div>
		</div>
	</div>
</header>
Very simple. The only issue here is the menu links, which don't actually go anywhere as we don't have any pages. But we can deal with that. So we can go to Headers and add a new Header to see the add form.
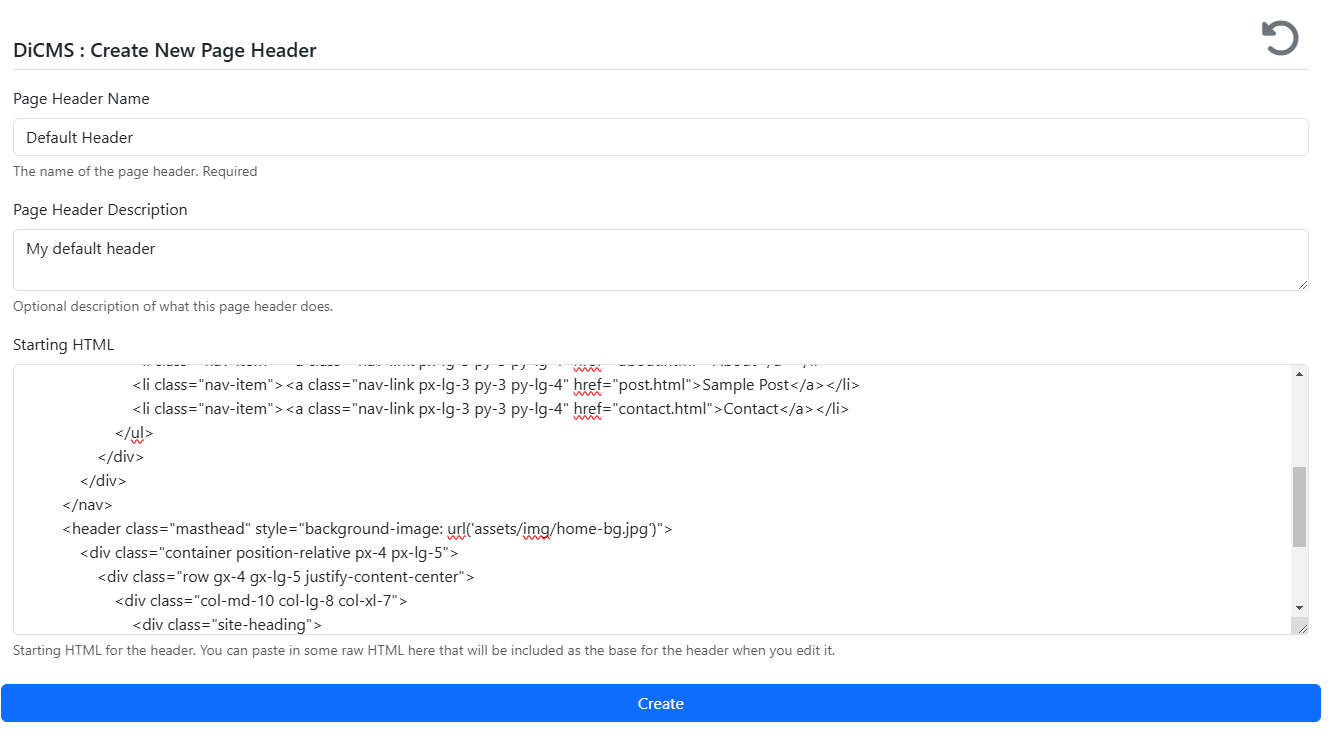
Notice that we can paste the original HTML into the the "Starting HTML" text area, this will give us a basis to start from. You can always leave this blank and you'll start with a blank canvass. But if you already have something you're working with, it's easier just to paste it. Once you enter it click Create. The header will be created and you will be taken to the edit page. Now the headers and footers all work pretty much the same in terms of creating and updating. Both will have the same forms (name, description, starting HTML) and both will take you to the edit page which, other than nomenclature, look exactly the same. To a lesser degree this is also true for when we build pages.
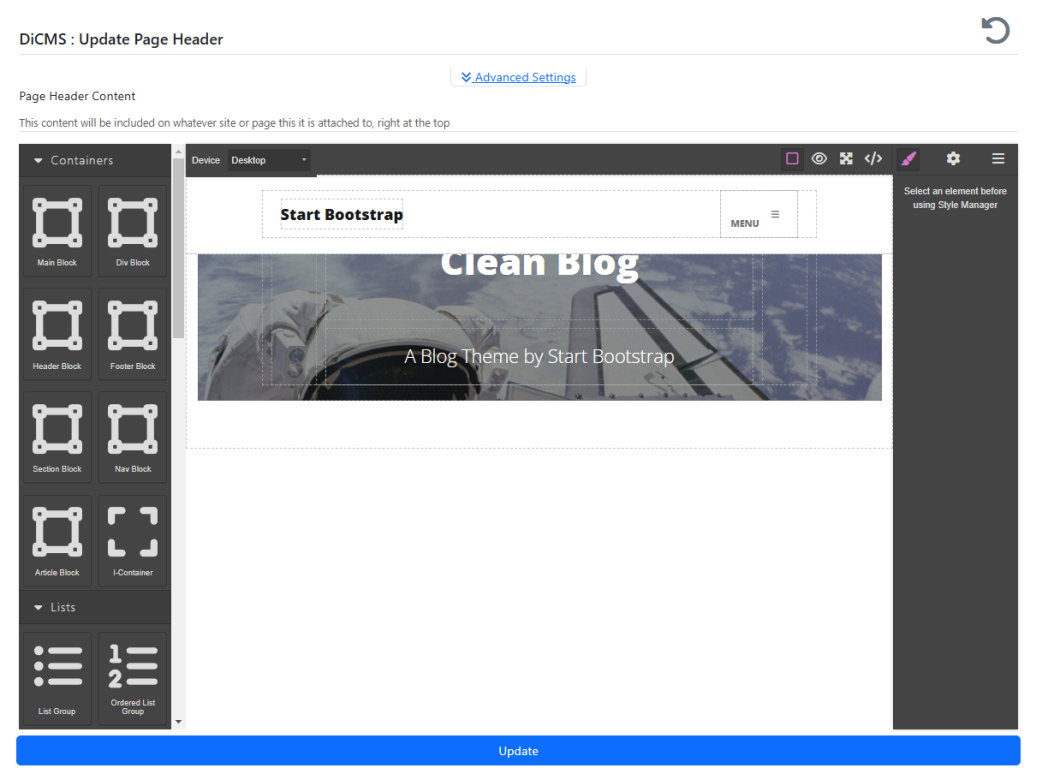
The edit page is where most of the magic happens. In here is where we get to directly edit all headers, footers and yes, even pages. All the editing happens in my custom version of GrapesJS, which is an open source html editor. I took the code and added things to make it mine, so this is not my project, just something I adapted. I do like how it turned out, and it suits the "programmer" side of me rather well. You can do all the editing in this editor, including adding color, text images, etc. It is fully integrated with the asset manager, so all you images will be available to you. I will be going over my changes to this editor on a separate blog entry.
Also, if you need to change the name or description of the header or footer, you can do so in the Advance Settings drawer at the top. Footers are essentially the same and we can create them based on the html code provided for us:
<footer class="border-top">
<div class="container px-4 px-lg-5">
<div class="row gx-4 gx-lg-5 justify-content-center">
<div class="col-md-10 col-lg-8 col-xl-7">
<ul class="list-inline text-center">
<li class="list-inline-item">
<a href="#!">
<span class="fa-stack fa-lg">
<i class="fas fa-circle fa-stack-2x"></i>
<i class="fab fa-twitter fa-stack-1x fa-inverse"></i>
</span>
</a>
</li>
<li class="list-inline-item">
<a href="#!">
<span class="fa-stack fa-lg">
<i class="fas fa-circle fa-stack-2x"></i>
<i class="fab fa-facebook-f fa-stack-1x fa-inverse"></i>
</span>
</a>
</li>
<li class="list-inline-item">
<a href="#!">
<span class="fa-stack fa-lg">
<i class="fas fa-circle fa-stack-2x"></i>
<i class="fab fa-github fa-stack-1x fa-inverse"></i>
</span>
</a>
</li>
</ul>
<div class="small text-center text-muted fst-italic">Copyright © Your Website 2023</div>
</div>
</div>
</div>
</footer>So now we have a header and a footer. If you just copied/pasted the HTML, you will still see the non-functioning menus. Since we have not built any pages, you can either delete them, or add placeholders or just leave them for now. Editing them will be left to the GrapesJS tutorial. Since we now have the skeleton of a page, it will be nice to see what it looks like. Let's go back to the Site and set them as the default header and footer.
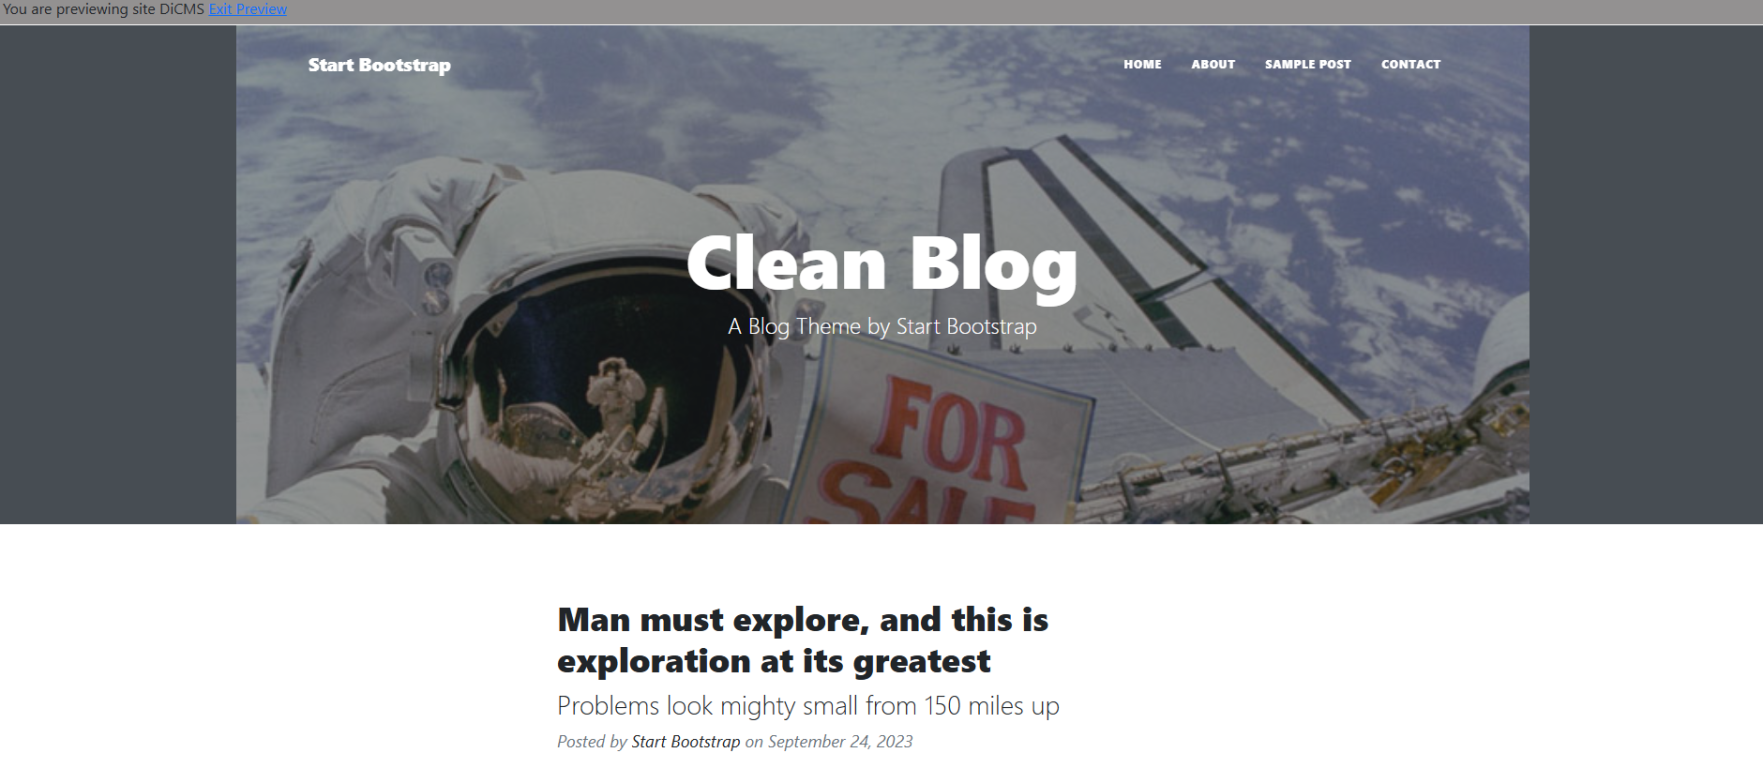
Once that's done (make sure you click the save icon!) hit the icon at the top to see a preview of your site so far.
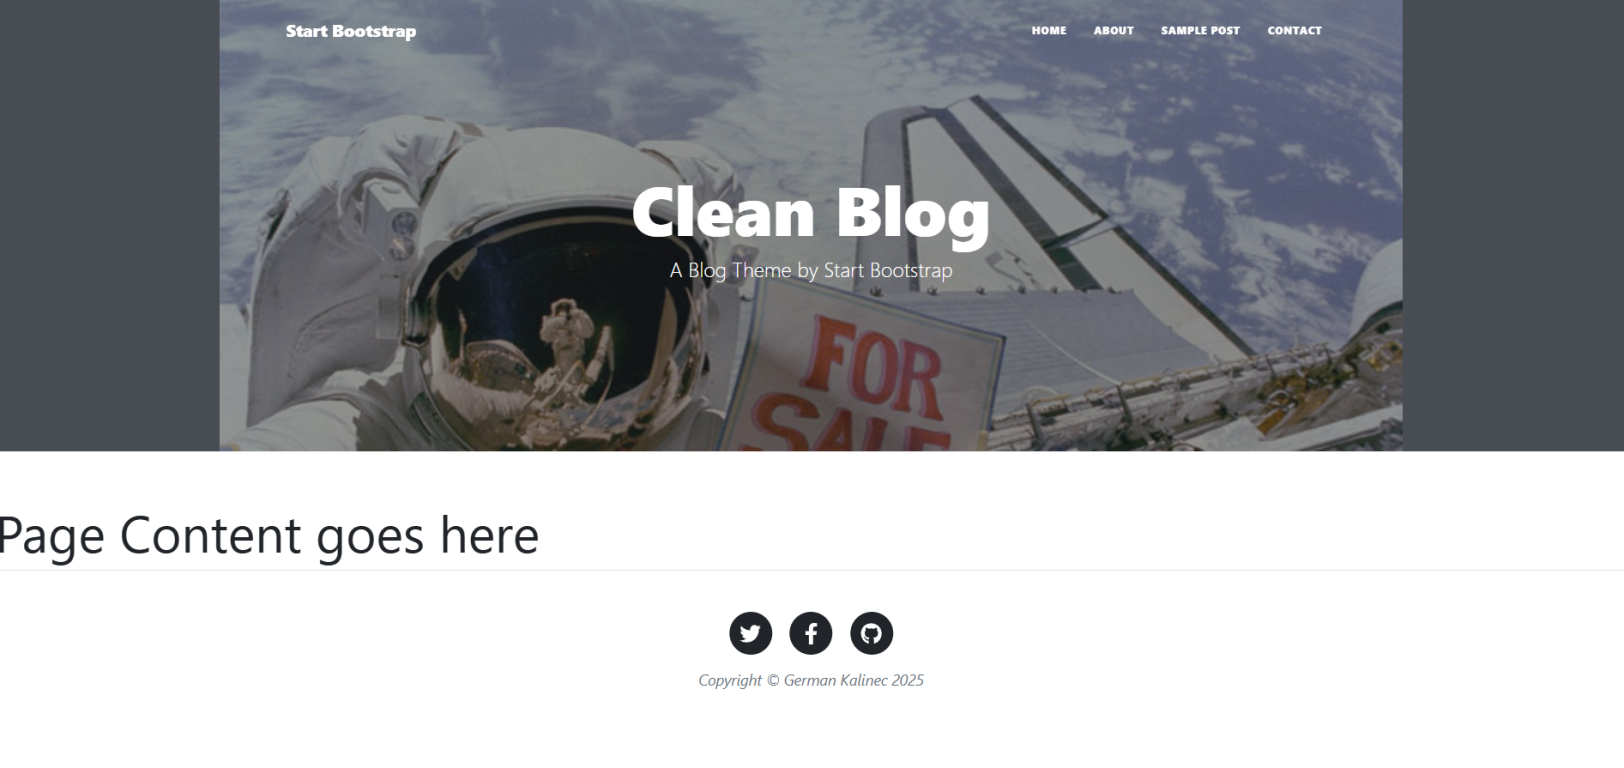
Looks great! We still need some page content, but the outline is there.
The Actual Content: Pages
We're almost to a start site! But now we need to add the actual content, which are named pages in this system. The listing, creating and editing of pages work and look basically the same as Headers and Footers, so I will simply jump in to the Page creation. While getting to here is the same as Headers and Footers, the page creation page looks different.
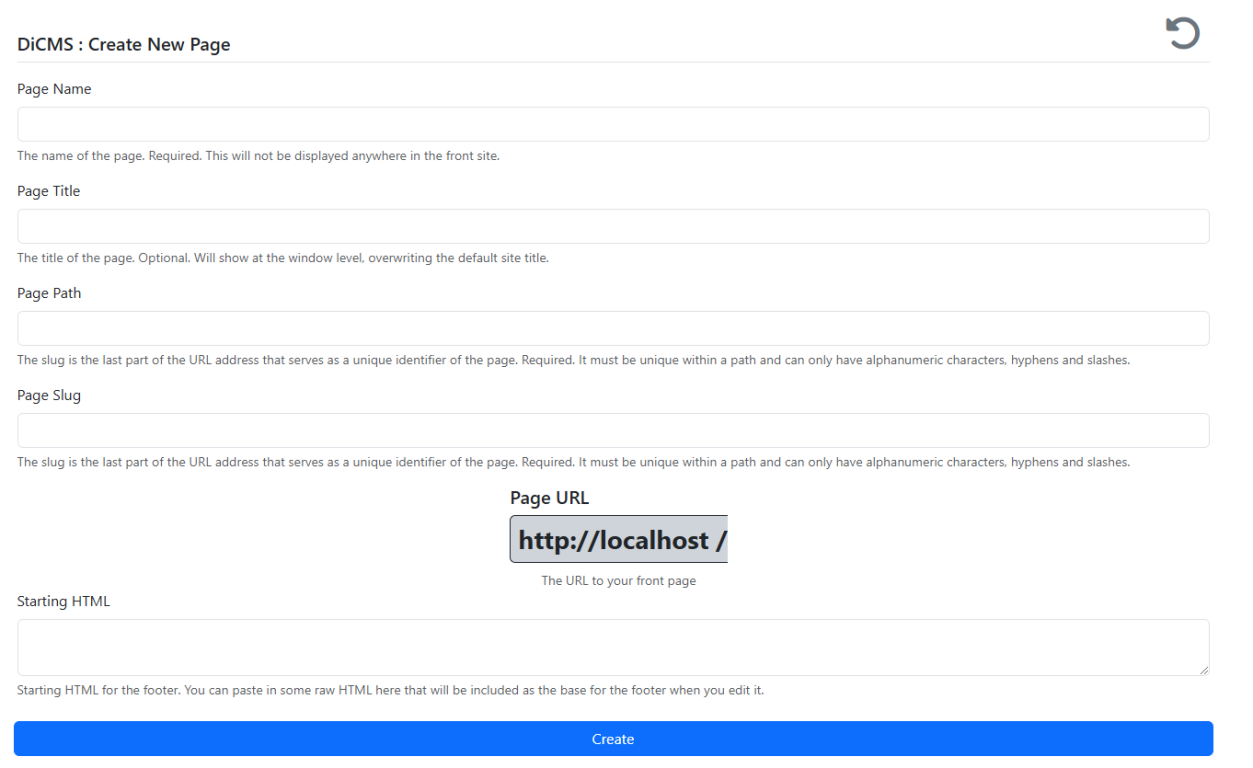
Let's go over some some of these fields:
Page Name - A standard name for this page. Is only used to refer to this page internally.
Page Title - This is the title of the page. This will show up on the title of the window. If left blank, it will default to the Site Title.
Page Path - This field works in tandem with Page Slug to create a Page URL. The Page URL is the URL that is used to reach this page and it is made up of three parts. The server part, which includes the http://url is set in stone from wherever you're hosting this page from. In the above example, it is being hosted in my local computer but in my "real" website it would change to https://dev.kalinec.net/. The page path is the part between the server URL and the Page Slug. The Page Path is not required, but the Page Slug is. Neither the Page Path or the Page Slug can contain spaces or strange characters.
Page Slug - This field works in tandem with Page Slug to create a Page URL. The Page URL is the URL that is used to reach this page and it is made up of three parts. The server part, which includes the http://url is set in stone from wherever you're hosting this page from. In the above example, it is being hosted in my local computer but in my "real" website it would change to https://dev.kalinec.net/. The Page Slug is the actual name of the page and it is required as it actually points to the page. In most cases the path will not be used and the Page URL will end up being the server name and the slug.
Page URL - While you can't directly type in this value, you can see it change as you add the correct parameters. You can change the parameters to adjust the URL to your liking. There are no real "directories" being created, so you can make your path as long or as short or as descriptive as you'd like. Anything from mydomain.com/home to mydomain.com/this/is/a/blog/post/about-nothing is ok.
Starting HTML - Like in Headers and Footers, this allows you to paste raw HTML to serve as a basis to edit. Optional.
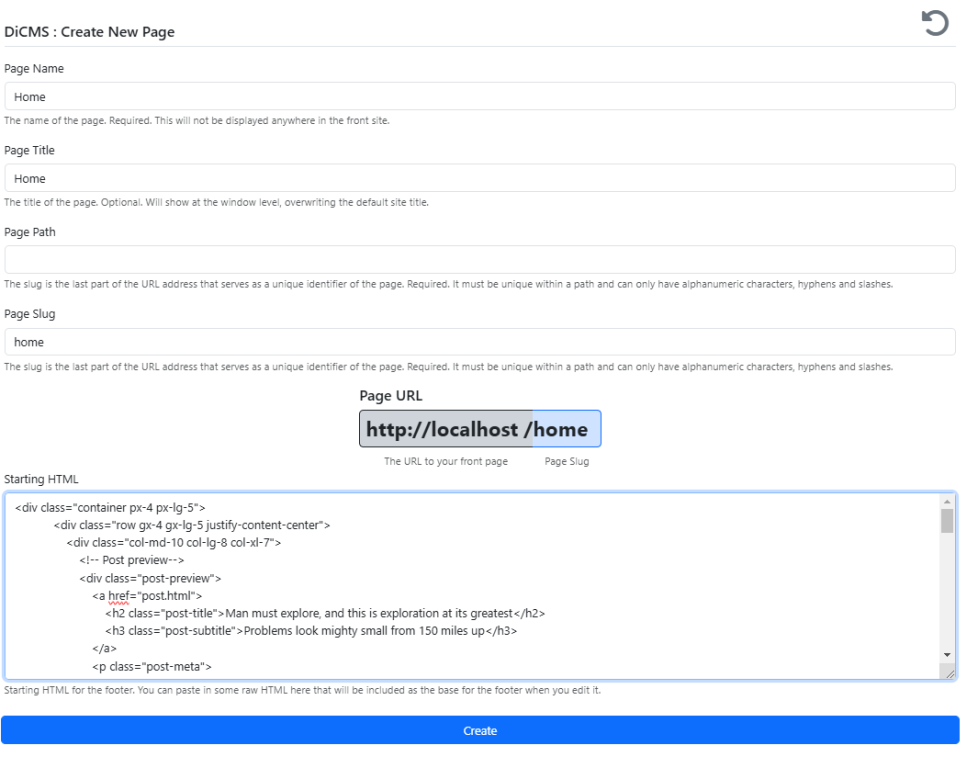
Looking at our index.html file the main content looks like:
<!-- Main Content-->
<div class="container px-4 px-lg-5">
	<div class="row gx-4 gx-lg-5 justify-content-center">
		<div class="col-md-10 col-lg-8 col-xl-7">
			<!-- Post preview-->
			<div class="post-preview">
				<a href="post.html">
					<h2 class="post-title">Man must explore, and this is exploration at its greatest</h2>
					<h3 class="post-subtitle">Problems look mighty small from 150 miles up</h3>
				</a>
				<p class="post-meta">
					Posted by
					<a href="#!">Start Bootstrap</a>
					on September 24, 2023
				</p>
			</div>
			<!-- Divider-->
			<hr class="my-4" />
			<!-- Post preview-->
			<div class="post-preview">
				<a href="post.html"><h2 class="post-title">I believe every human has a finite number of heartbeats. I don't intend to waste any of mine.</h2></a>
				<p class="post-meta">
					Posted by
					<a href="#!">Start Bootstrap</a>
					on September 18, 2023
				</p>
			</div>
			<!-- Divider-->
			<hr class="my-4" />
			<!-- Post preview-->
			<div class="post-preview">
				<a href="post.html">
					<h2 class="post-title">Science has not yet mastered prophecy</h2>
					<h3 class="post-subtitle">We predict too much for the next year and yet far too little for the next ten.</h3>
				</a>
				<p class="post-meta">
					Posted by
					<a href="#!">Start Bootstrap</a>
					on August 24, 2023
				</p>
			</div>
			<!-- Divider-->
			<hr class="my-4" />
			<!-- Post preview-->
			<div class="post-preview">
				<a href="post.html">
					<h2 class="post-title">Failure is not an option</h2>
					<h3 class="post-subtitle">Many say exploration is part of our destiny, but it’s actually our duty to future generations.</h3>
				</a>
				<p class="post-meta">
					Posted by
					<a href="#!">Start Bootstrap</a>
					on July 8, 2023
				</p>
			</div>
			<!-- Divider-->
			<hr class="my-4" />
			<!-- Pager-->
			<div class="d-flex justify-content-end mb-4"><a class="btn btn-primary text-uppercase" href="#!">Older Posts →</a></div>
		</div>
	</div>
</div>
We will be creating a page with this content that will serve as our "home" page. So me might as well call this our home page and have the urn set to https://mysite.com/home. So first we will enter all the information, hit create and that will take us to the same editor as Headers and Footers.

You can change any of the HTML of the home page if you feel like or wait until the GrapesJS tutorial. There is some other settings that we can change from here. If you would like to change any of the settings that you entered during the creation stage, then click the ![]() icon at the top and you can edit all the information. Be very careful with this as you can mess up your system by changing the URL of pages.
icon at the top and you can edit all the information. Be very careful with this as you can mess up your system by changing the URL of pages.
Opening the Advanced Settings drawer on the page editor will reveal the true power of the Page. From here you can customize the page as if it was it's own site. You can add custom JavaScript CSS, Headers and Footers. You can also override them completely and have the page have its own look and feel.
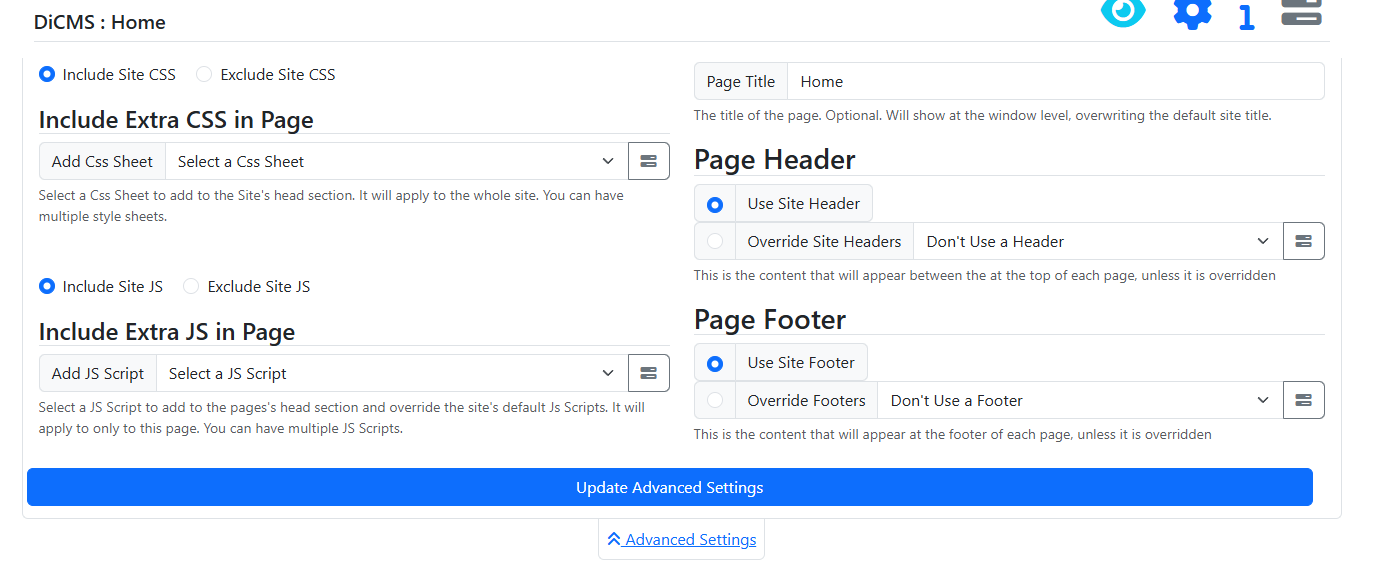
Clicking on the ![]() icon at the top will take you the metadata for the page. This is used extensively in social media so that people can share your page. Sharing pages can be done through widgets or automatically so long as the correct metadata is setup. The current important metadata as of the writing of this document is the Twitter standard and the Open Graph standard. Both of these metadata entries can be added by clicking the appropriate buttons on metadata editor. You can also override any metadata from the main site or add your own custom metadata information.
icon at the top will take you the metadata for the page. This is used extensively in social media so that people can share your page. Sharing pages can be done through widgets or automatically so long as the correct metadata is setup. The current important metadata as of the writing of this document is the Twitter standard and the Open Graph standard. Both of these metadata entries can be added by clicking the appropriate buttons on metadata editor. You can also override any metadata from the main site or add your own custom metadata information.
When you first create the page, it will be set to Unpublished. Clicking the button "Publish Page" will actually publish your page and make it "Live". This will make it available for people to access it, even if there's nothing to link to it. Similarly, unpublishing the page will make it unreachable by the public. most of the time though, you will like to see what the page looks like. You can do this by clicking on the icon at the top of the page to see a preview of what this page looks like in the context of the site. We can also go back to the site, select it as the default homepage and preview the site from there.
That's pretty much the first page of the site and what we set out to do. A lot of the pages still need to be added, the main menu needs to be customized and more content needs to be generated. But first!
Publishing the Site
We have everything we need to publish this site, so let's do that. Two things will need to happen: the home page needs to be published, and the site needs to be activated. The home page is easy enough, simply go to the page, edit it and click the Publish Page button. This will publish the page and will now get a warning if you choose to unpublish this page.

To activate the site, go back to the Site view and click the Activate Site button. The warning about activation will change to a warning about de-activation.

Going to your home URL (either http://yourdomain.com/home or just http://yourdomain.com/) will render the page that you made, with the headers and footers. Congratulations! you now have a working, 1-page site!