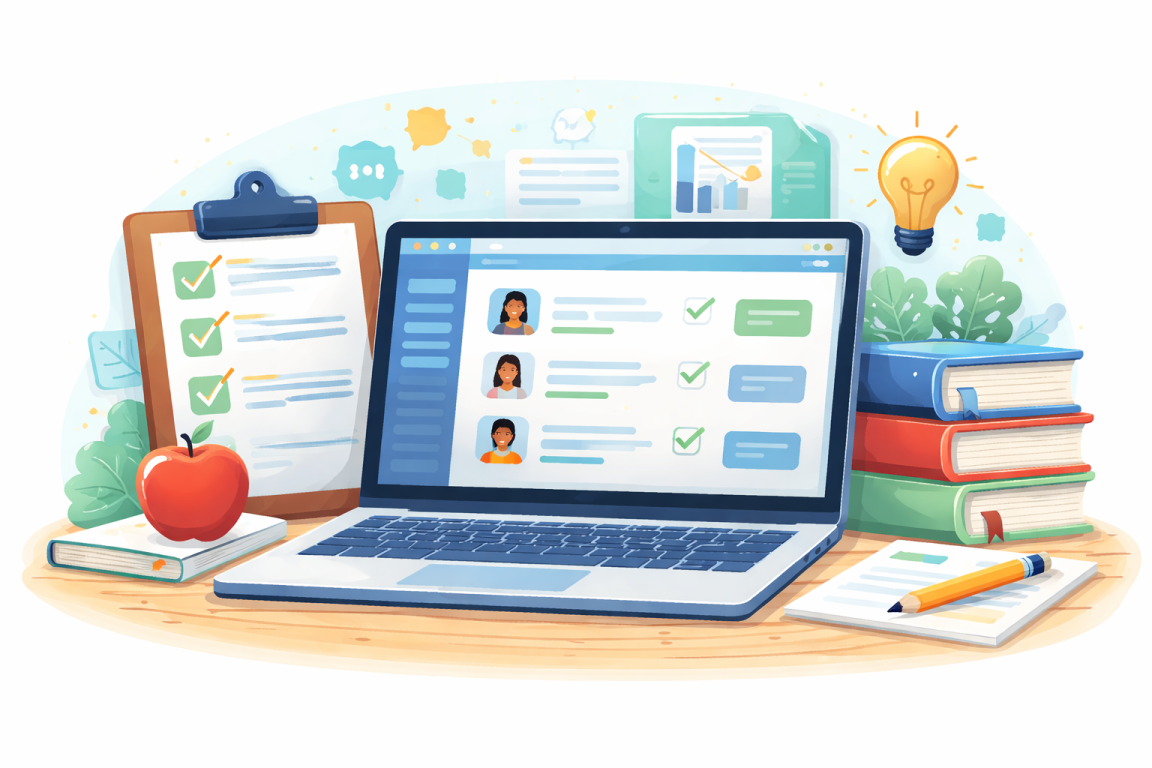
Class Management and Assessment
and communicating the information
I was able to work quite a bit on this release, however due to my passion (I guess it's what I can call it), I went overboard and tweaked a lot more than I thought I would. Because of this, I ended up releasing a dev guide to talk about my implementation of Integrators. But how did I get here? Well, let's go over a lot of my changes and how they developed.
In the post before my last one, I released my first version of Learning Demonstrations, which seek to allow teachers the ability to create the templates but not post them or anything. The goal that I set for myself in that post to build next was:
My next step will be the ability to assign these demonstrations to classes/students and create a way for students to view these assignments and maybe even work on them/submit them. I doubt I will get the assessing part, but it will be next after it. I will also need to make a class landing page and I think I would like a way to integrate Google Classroom into the system using the Integration system I built 2 releases ago.
This set up my workflow that I've been doing until now. I'm at a good place to release now, but I wanted to talk (write?) this through to make sure that I'm not forgetting anything. The first thing I decided to do, was to code the ability to post these wonderful new Learning Demonstrations to students. For this, I needed to add a posting mechanism to my “Editor”. This is where I made my first decision: to decouple the idea behind templated and Learning Demonstrations. My original thought was for teachers to be able to “create” templates that they could then repeatedly use to post other Learning Demonstrations. The idea behind templates, I worried, might be too much for teachers to grok and work with effectively. SO, instead I opted for “hiding” the subtle difference. Instead, I decided that teachers will always be creating Learning Demonstrations Templates. Templates could be edited, deleted, created, altered, etc. The only way to post a Learning Demonstration, however, is to use this template as a basis for starting. What this means is, whenever a teacher creates a new Learning Demonstration, they are creating a template that they can re-use throughout their time at school. This template is attached to a course but can be used to post Demonstrations in any courses.
Because I've really fallen in love with the work flow of Livewire, I decided to do all the new stuff as Livewire components. Thus, each Learning Demonstration is only accessible through one of the Livewire components I created, which allows me to re-use a lot of the sub-components in each one. I came up with the following needed components that would be the backbone of the Learning Demonstration System:
LearningDemonstrationCreator: This component is used to create a Learning Demonstration Template. It asks the teacher to define either an objective or a set of skills, and creates the basic information need for a template.LearningDemonstrationPoster: This component takes a Learning Demonstration Template that was created and allows the faculty to add information to it (or let AI do it), and to post the Learning Demonstration to at least one student and at most every student in every class the faculty has access to.LearningDemonstreationIndex: This component lists all the available Learning Demonstration Templates.LearningDemonstrationEditor: This component allows a teacher to edit an already-posted Learning Demonstrations. It will also allow the teacher to delete it (or un-post it), although I'm still thinking about what conditions, if any, should be present before deletion is available.LerningDemonstrationAssessor: This component allows the teacher to assess a posted Learning Demonstration.OpportunityViewer: This component allows students and parents the ability to look at a Learning Demonstration that they cannot work on (either because it is already assessed, or past the due date).OpportunityDemonstrator: This component allows the student to work on the Demonstration and to submit it if online submission is available.
Once I had the components defined, I decided to build the posting system so that I could start posting Demonstrations. I took my original editor that edited templates and made it into the LearningDemonstrationPoster component. Then I added the following widget at the end to be able to post to classes and students:
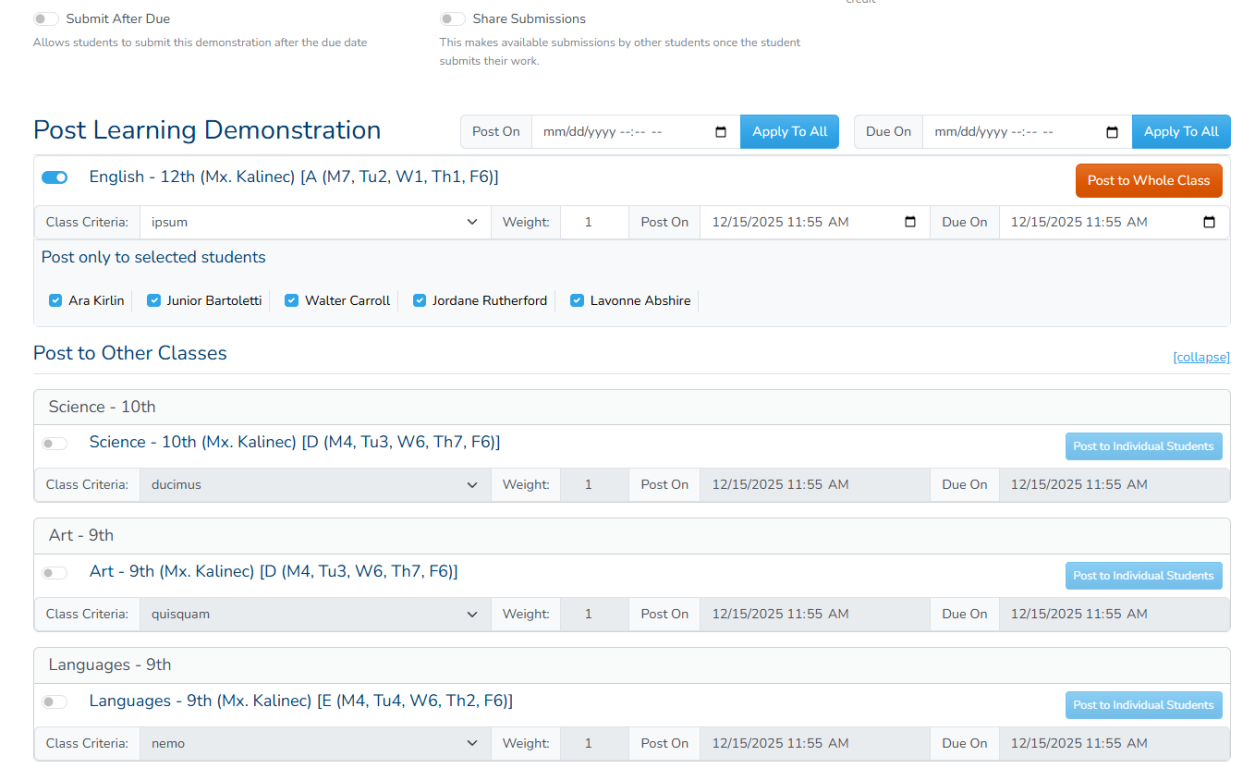
This allows the teacher to post to the classes in the course that the template is listed under, but also allows the teacher to select any other class they teach. The teacher is expected to supply a post on date, a due on on date, a criteria that this will be assessed under and the weight that this demonstration will be weighted against in that criteria. There is also a button that toggles whether the Demonstration should be posted to individual students or the whole class. Once the details are submitted, the demonstration is posted is posted to all relevant students. A few things happen then, described by this workflow:
- The teacher clicks post Demonstration on the poster.
- Note that this is working with a template, not the demonstration directly.
- The system first creates a Learning Demonstration Model that will represent the Demonstration that was posted.
- All the values from the Learning Demonstration Template are transferred to the newly created Learning Demonstration.
- All basic fields are copied, not referenced, meaning that changing the template will not change the posted Demonstration.
- A copy is made of every file attached to the template and linked to the demonstration, thus changing the file in the template will not affect the demonstration.
- The Demonstration is linked to the same skills that the template was liked and it saves the rubric that was defined for each skill in its own table. Same as before, changing the rubric or the skills on the template will not affect the demonstration.
- For every class session that the demonstration is posted to (no matter the number of students) a link is established to the new Learning Demonstration model.
- This link contains the global post on date and due on date that was set globally to the class.
- It also saves the criteria attached to the class and the weight for reference.
- For every student in the class that this demonstration is being posted to, a Learning Demonstration Opportunity Model is created.
- This model links the student with the class session, which then links to the actual demonstration.
- The Opportunity Model has it's own post on and due on date that is first copied from the global, but can be changed later.
- For every Learning Demonstration Opportunity created a link is made to every skill that is being assessed.
- These links are the same as the links between Skills and the Learning Demonstration.
- A modified rubric is saved to this link, which will hold the assessment information.
- A notification is then sent to all parents and students that want to know.
I was able to do this fairly quickly until I came to the last step. Notifications themselves were not enough, as I also needed a way for students (and teachers, really) to see what was posted to them and interact with the Demonstrations. The place to do this was, of course, in the classroom viewer, where all the details about the classes are to be displayed. I had worked on this to a certain extent, but I had to stop because I couldn't see how to make it work. I had also built a small class notifications system which did not include subscriptions and was very limited, so I knew that it needed to be made better. Finally, I wanted the ability to be able to integrate other services in the email and communication components that would allow me the ability to broadcast messages and notifications to a wide variety of services, including being able to use a different class management system. This forced me to take a look at my integration system to enhance it to the point that it might be more useable.
Better Communication Through Integrations
I knew that I needed to build the classes system. I also knew that I wanted to make sure that the integration piece was working correctly so that I could use that to integrate the class management system. I also knew that the integration piece was not fully formed and needed to be enhanced. With all this in mind, I decided to beef up the integration system to make sure it could handle the class management piece and I decided to do this by enhancing the communications system as well.
The current communications system used the built-in system mail component to send email which, at the time, was only a single email, the reset password email. I wanted this to be a more robust and extendable system that would send emails and other forms of communications. I wanted to put everything together so that the system would be closely integrated and could be expanded to other services. so I expanded the idea of what messages are to a single model: School Messages.
The idea behind School Messages was based on the fact that there are communication messages that should be sent to people in my system, about something. They could be system message, which are messages automatically generated by the system, or user messages, which would be message sent by individual users that need to send mass-communications to other users. My goal was to implement system messages so that all messages that are system-created could be dispatched, while still leaving room to grow the system to include user messages at a later time. I also decided that my system will rely on three different communication mechanisms that would cover all cases.
- Email Communication: These are long-form communications that expect almost unlimited message space. It can also contain files and use HTML to build the message.
- SMS Communication: These are short messages that are delivered through cell phone texting. There is a lot of regulations regarding the ability to send text messages, including (in some cases) needing to get a license to be able to send messages, due to privacy concerns. For this reason, this types of communications needed to be isolated.
- Push Communication: These are the messages that we would allow the integrators to take control. Push messages can be long or short and can be delivered through a lot of different means. I wanted to guarantee one method of delivery, which is through push-messages using Laravel Broadcasting/Echo servers.
To this end, I scrapped my previous email system and rolled out something that (I think) is more expansive and has better ability to grow. The first step was in defining what a School Message Model looks like. His model would be stored in the database table school_messages and would have an entry for every type of message that they system has, but also have room for user-defined messages at a later time. This is the table definition:
| Field | Description |
|---|---|
| id | The id in the table entry. |
| system | Whether this message is a system message. If it is, then this message can only come from the system, not the users. |
| subscribable | Whether users can subscribe to this kind of message. |
| force_subscribe | Whether users should be forcibly subscribed to this message. This setting overrides all other, so if this is set the message will reach all users that it is meant to, regardless of whether they're subscribed or not. |
| name | Pretty name of the message |
| description | Description of what this message is for. |
| send_email | Whether this message should be allowed to be sent through email. |
| send_sms | Whether this message should be allowed to be sent through text |
| send_push | Whether this message should be allowed to be sent through the push messaging system |
| subject | The subject line of the long-form message. This is used in all emails as the subject line. |
| body | The actual body of the long-form message. This is used in all emails as the body of them email and for every communication system that needs a long message. |
| short_subject | Subject for short-message that require a subject line. This is not used by the texting system. |
| short_body | The body of the short-form message. This is used mainly for texting, although it can also be used by short-message push messages as well. |
| notification_class | The class that this message is attached to. This class will define what variables are available to the messages, as well as who the messages will be notifying. |
| enabled | Whether this message is actually enabled in the system. |
Once this was built, there were a few more steps to do before it could be completed. First, all the services, Email, SMS and push had to be offloaded into the Integration System. You can see the dev guide for how this is done. Afterwards, I leveraged Laravel's event system to make it more friendly. This way, the system could simply send an event of something happening, which would then be picked up by the message subscriber, which would load the message and notification and combine them into a fully-formed message. It would then send the message out through each of the channels that are configured, assuming the users should receive the message, depending on the subscription settings.
The first thing I did is to populate the school_messages table with some of the messages that I would like to start working with. I came up with messages to reset user's passwords, update the class status, class messages activity, classroom activities, and Learning Demonstrations notifications. The user-based part of the system would be built at a different time, so I didn't worry about this yet. This small list of messages (seven in total) would give me a good start to be able to send different kinds of message for a good sample size. I made every single message except the password reset as subscribable, so that users could subscribe to them. I also added them to the database seeder so that I can get them onboarded as defaults for now, since there would be no way for the users to enter system messages.
Along with every single message I entered, I also created a single Notification class that would extend a base notification class, LmsNotification. This superclass would let me code the routing mechanism, so all my notifications would be delivered through the integration system, while also forcing the sub-classes to define what data they can provide to the user writing these notifications. The data would be specific to that Notification, meaning that a reset password notification would expose maybe the token needed to be sent to the user, as well as the user's name and email. The only requirement would be the token, but the extra data would add more detail to make the message more customized based on the user's need. I also made the decision that every single system message would require a custom, unique class. This would ensure that all system messages would have their own details and not use other messages details. This will not be the case for user messages.
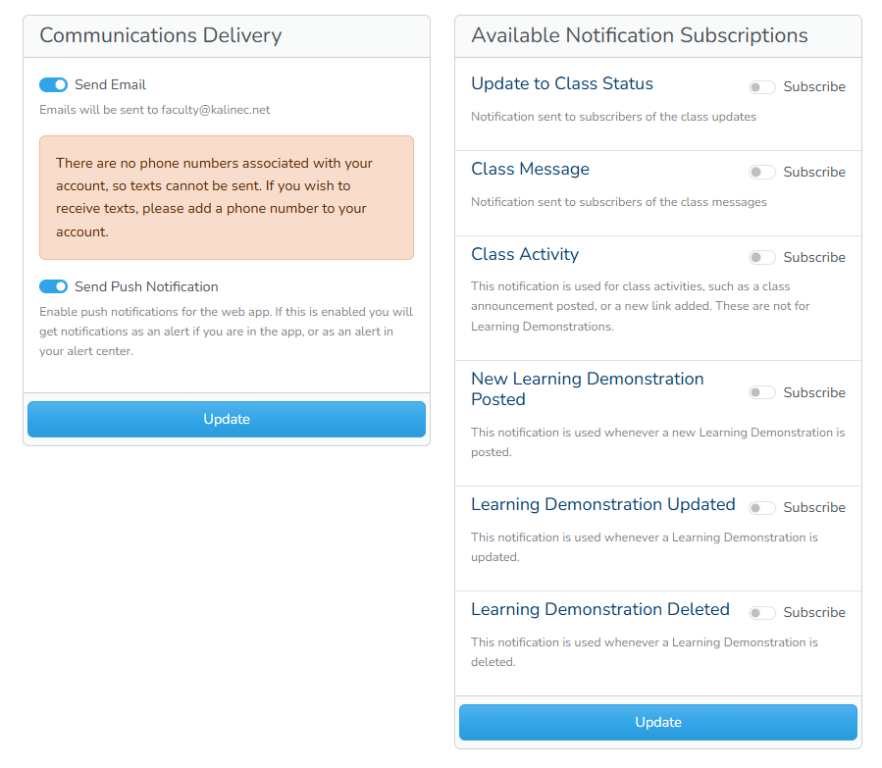
I then moved all the messages and their settings to the system settings area, since it made the most logical sense.

Clicking on each of the message would then lead to the revamped message editor, which used similar code as the old email system.
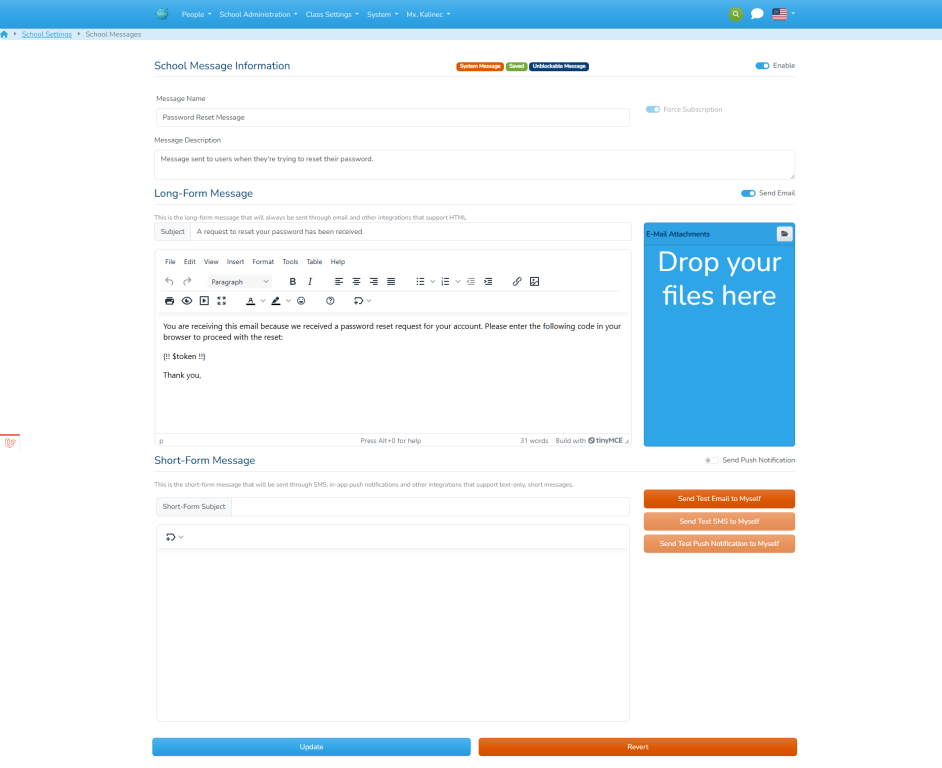
Finally, I also added a section to the user's profile to allow them to set their communications settings and to subscribe to notifications individually.
I then integrated them to the available Notification system so that notifications could be sent simply by doing $user→notify(new NotificationClass($schoolMessage, …$other parameters). This notification class would then load the message and supply the data passed to it to the school message. It would then determine which services to deliver to. Each service would then be in charge of actually pushing the information. To give a concrete example, this is the expected workflow for a notification that will let students (and parents) know that a new Learning Demonstration was posted.
- When the faculty posts a new Learning Demonstration, a
DemonstrationPostedEventis fired. The Learning Demonstration created is passed to it. - The class
LearningEventsSubscribersubscribes to all demonstrations events, to it fires when the event is dispatched. - The subscriber then sends a new
LearningDemonstrationPostedNotificationto each of the students that the Demonstration was posted to and to the student's parents. - The uses the data passed to the event to generate the text of the
bodyandshort_bodyusing Blade as a template. - The
LmsNotificationsuperclass then finds checks to make sure that the notification should be sent to the user- It checks if the notification is forced
- It checks if the notification is enabled
- It checks that the user has subscribed to the notification.
- The
LmsNotificationsuperclass determines the appropriate channels to send the notification through. - Each channel then calls the integrator assigned to it to send the message.
Using the same workflow, all system notifications can now be built, subscribed to and edited by the appropriate members of the system.
Integrating Classroom Management
The next step was to build the class management system. Immediately there were two issues: The field permissions were giving me issues determining the correct permission to view fields, especially while running it in a user-less state. This was due to the fact that, in order to view a field, a user with the correct permissions should have accesses it. However, when sending notifications, or similar events, they would either run without a user or with the user the sends the notification. Depending on the view permissions (which affected everyone accessing fields), it would crash when trying to access certain tokens. What made it worse, was the vast number of queries my ap would have to execute whenever viewing another user. Sure, it can be mitigated by caching, but the complexity was such that even caching would take up a lot of resources.
The second issue was the same issue that I had before: who can see the classroom, how are viewing permissions used and what should every user. This becomes more complicated when you start adding multiple roles for a user. To give an example, a user could be a faculty and parent, thus there must be a way to see certain classes as a parent and others as a faculty member. If it was also an admin tracking student, it would become even more problematic, as it would add more classroom and different viewing options. Finally, a parent with more than one student needs a way to differentiate between which classes they are seeing for which student, so there must be a mechanism, either hidden or explicitly defined, for a parent to “choose” which child's information they're currently seeing.
I do not, as of yet, have a solution that I like for the first issue, so as a temporary measure I removed all viewing permissions. The system now runs a lot faster without the queries and less permission errors. I will have to think about a solid fix in a different build. The second issue was dealt by thinking through how the viewing should work. The priorities are as follows:
- If user is a student, viewing a class that they're enrolled in (either past or present), the user is a Student Viewer.
- If the user is a faculty and the class they're viewing is a teacher in the class, the user is a Faculty Viewer
- If the user is a parent, check if the student they're currently viewing as is in the class, then they're a Parent Viewer.
- If the parent is tracking and viewing a student that it is in the class, then they're an Admin Viewer.
- Everyone else is denied permissions.
Once that decision was made, the next step was to decide how far I wanted to build the class management system and what features I should include. I don't have any illusions about the amount of work that it takes to make a class management system that looks really well, is friendly, and can post everything that a system that build by many collaborating engineers and a lot of money can build (e.g. Google). So my goal was to build a very simple class management system with the following features as a minimum:
- It should allow teachers to see information about the posted LD's and offer a way to:
- Create and post LD
- View if work is submitted
- Assess submitted work
- offer any alerts coming from students.
- It should allow students to see information about all the LDO's that they are assigned and offer them a way to
- Work or view details about the LDO
- Submit work to the LDO
- Ask questions about the LDO.
- It should have a large announcement area to display important announcements.
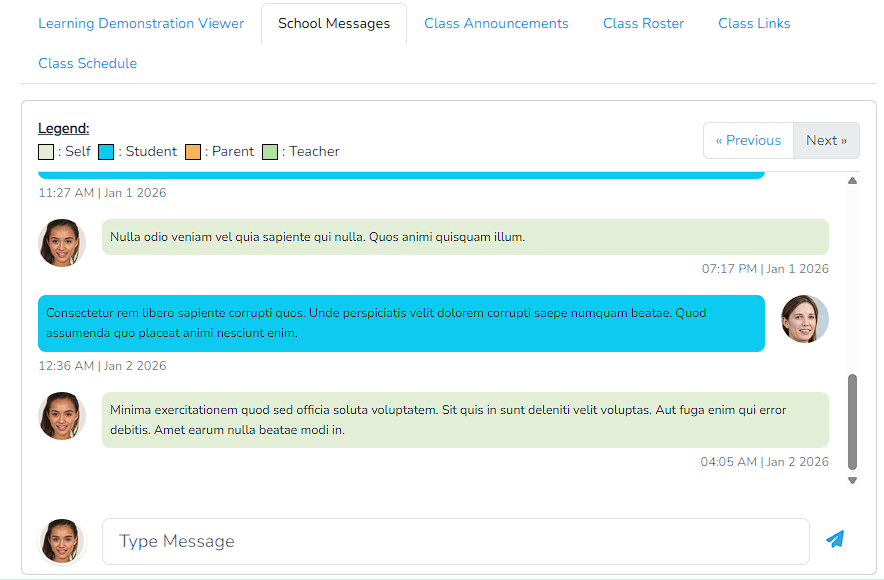
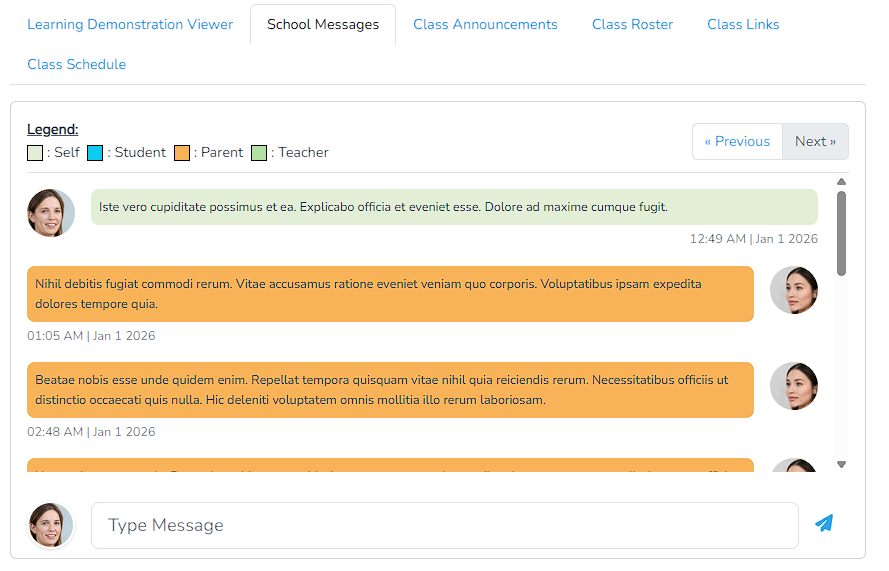
- It should have an area to display messages and be able to interact with them.
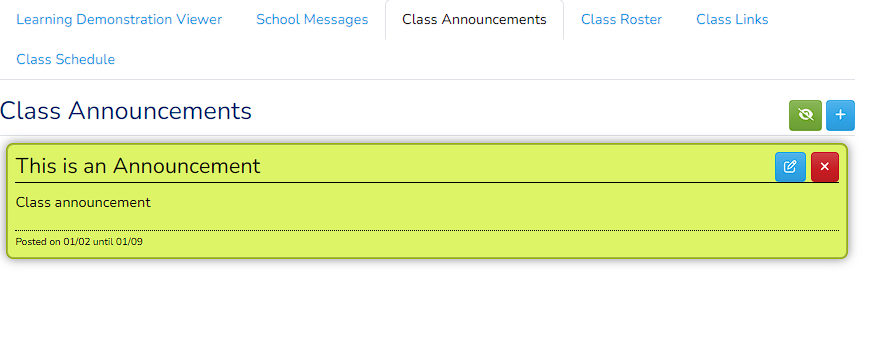
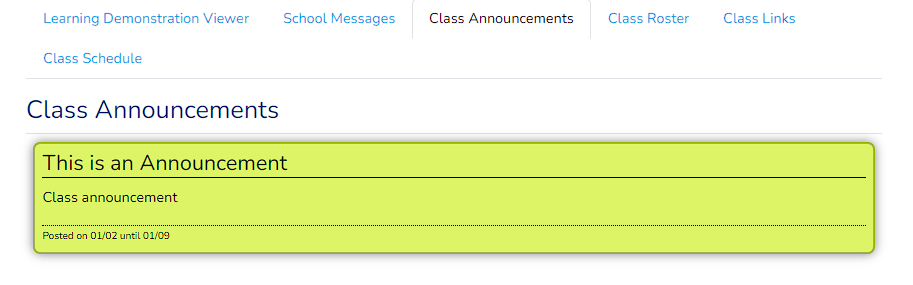
- It should have an area to post “class announcement”, which there can be many of, have a post and expiration date, and be able to upload documents.
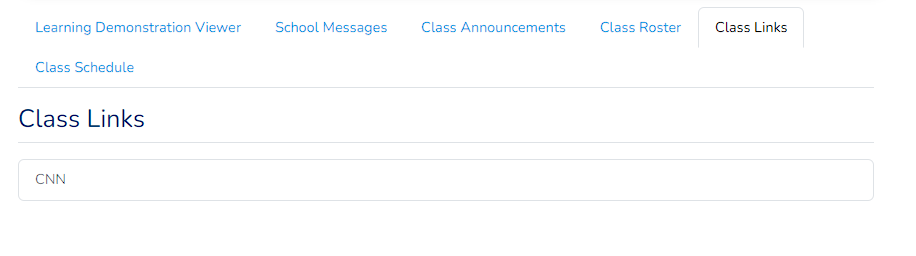
- There should be an area to post important links that are used by the class.
- It should have basic information about the class including:
- class schedule
- rosters
- class location
- Student's current assessment in the class.
My goal was then to be able to integrate the Google Classroom aspect so that users could choose on whether to use Google Classroom as a management tool instead, this giving teachers options. Ideally more integrations would be eventually possible, but Google Classroom seemed like a good starting point, plus I already had the Integrator built for other functions. I would also need a mechanism for teachers to be able to pick their own classroom management options if allowed by the school. I decided that the first step was to build my own version of the classroom manage that was small and easy to use and leave the more powerful integration for afterwards.
With that in mind, I created a full-page Livewire Component that would drive the class management. I also had to make some storage decisions for two different kinds of data. The first kind is what I call the Layout Data. This is a JSON column in the class_sessions table labeled layout that can be used by the class manager to store layout information. I made the field cast into an array and added no extra logic, this way it becomes a sort of “storage bucket” where the class manager can store information. Speaking of the class manager, I also added a field to the class_sessions table that would link the class to a ClassesConnection model that would be in charge of handling the actual class display. This way, once the class layout manager is established, it is easier to reference.
The second kind of data is data that the class will need to persist information that is “posted” to the class. This could be links, or class announcements, or class statuses, etc. My first instinct was to keep this data in the layout JSON column, since it would already be storing data about the classroom, but I realize that, throughout the year, a lot of data is generated and discarded in terms of announcements, links, etc. Plus, the more “widgets” I decided to add, the more of this data would be generated. If I wanted to import a class announcement from another class, I would have to find the class, unwrap the class layout array and search for the information, which would be really inefficient.
Instead of this approach, I opted for the database approach, in which I could store each of these “communication objects” in a row in the database and be able to query it when needed. I also did not want to have to create a single table for each type of communication; meaning I did not want to have a class_announcements table, or a class_links table that would each keep all class announcements and links respectively. With this in mind, I created a new table called class_communication_objects and the corresponding model ClassCommunicationObject that would be in charge of persisting any information about class communications. Part of me wanted to fold the class messages into this system, but I decided against it since class messages will be generating enough data to be able to use their own table. Adding this new table also gave me a neat little feature of being able to “sync” widgets if I wanted to, meaning that if I saved all class announcements in my local class manager, I could “export” all of these into another class manager, such as Google Classroom, without losing any data. The class_communication_objects is defined as follows:
| Field | Description |
|---|---|
| id | The primary id of the communication object. |
| session_id | The id of the session that this communication is attached to |
| className | The class name that this should resolve to when loaded. This allows the same pattern I've been using that lets me extend the model into its own logic class to handle all the logic for the communication object. |
| value | A JSON column to store the data for this communication object. This can be text, or a structure that can be deciphered by the extending class. |
| posted_by | Link to the person who posted this. |
| created_at | When the communication object was last created |
| updated_at | When the communication object was last updated. |
I also made sure that the ClassCommunicationObject implemented the Fileable interface and inherited the HasWorkFile trait, which allow me to link files to any communication objects. Finally I also created a dedicated work storage space for all classrooms to store files they needed for communication objects. I also had a small and very limited version of a class management system that I had written a while ago. I decided to re-tool this component into a component that would be handled by the LocalClassesConnection model in order to show the class to the different viewer. It's not the prettiest, but it is functional.
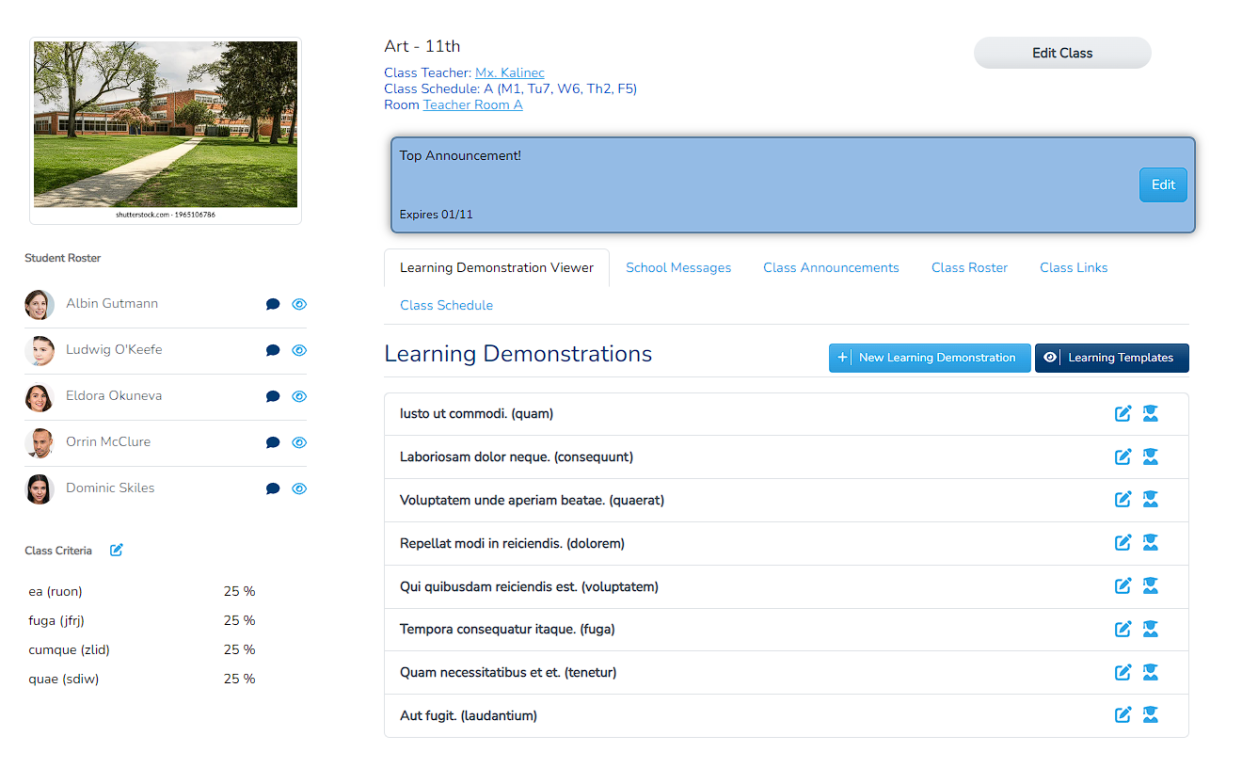
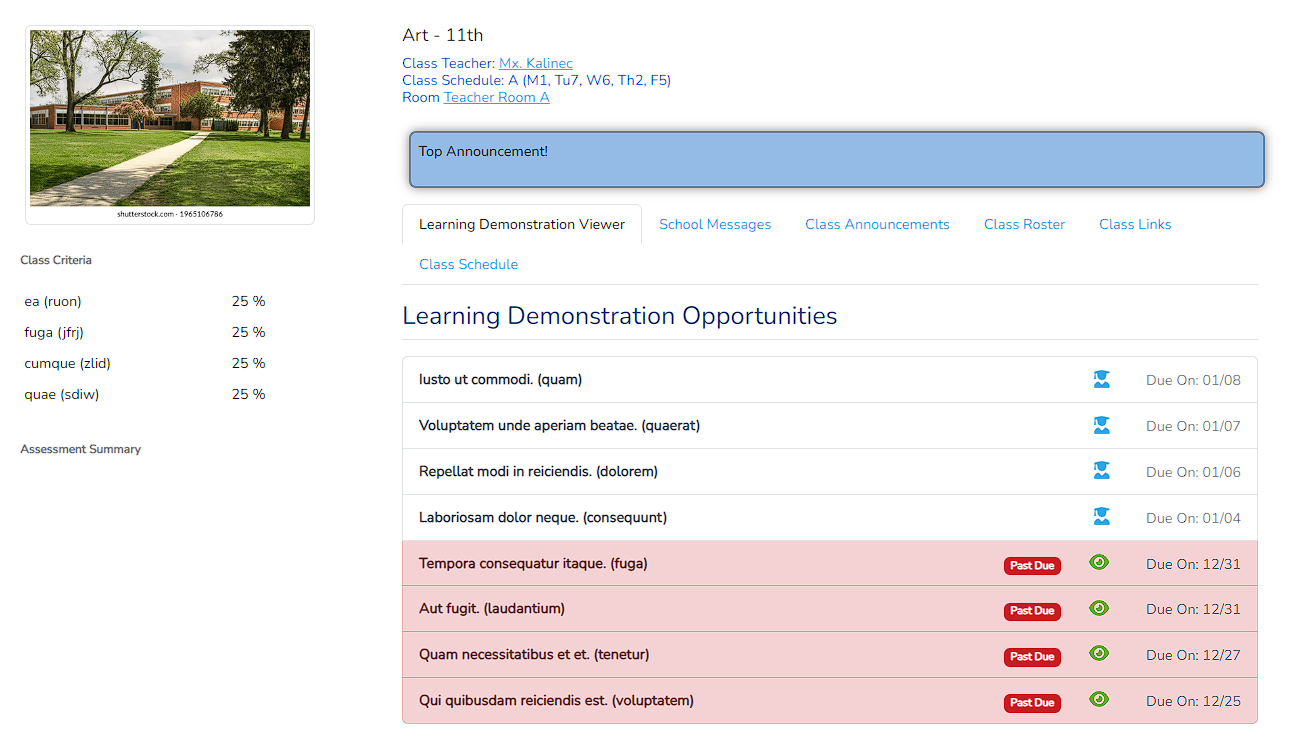
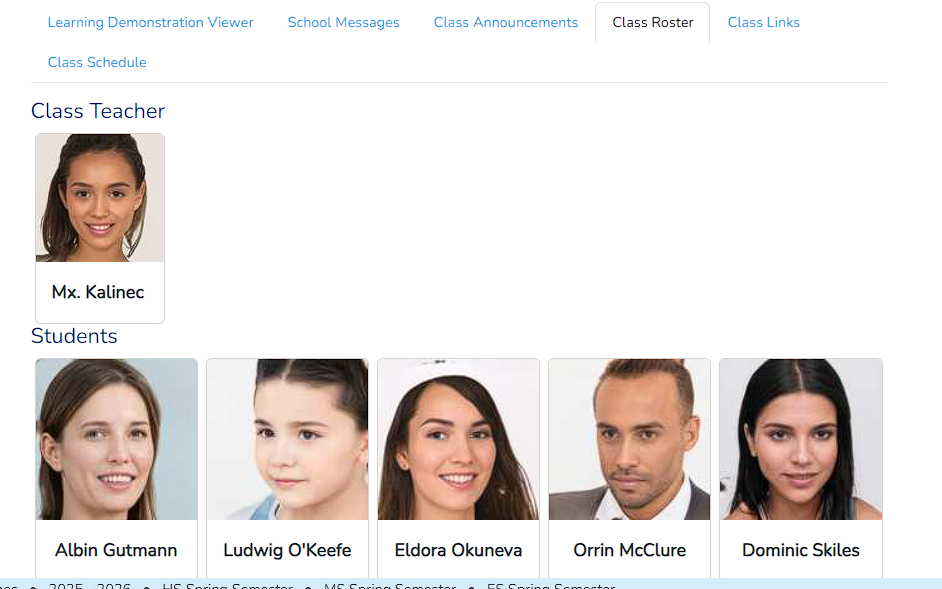
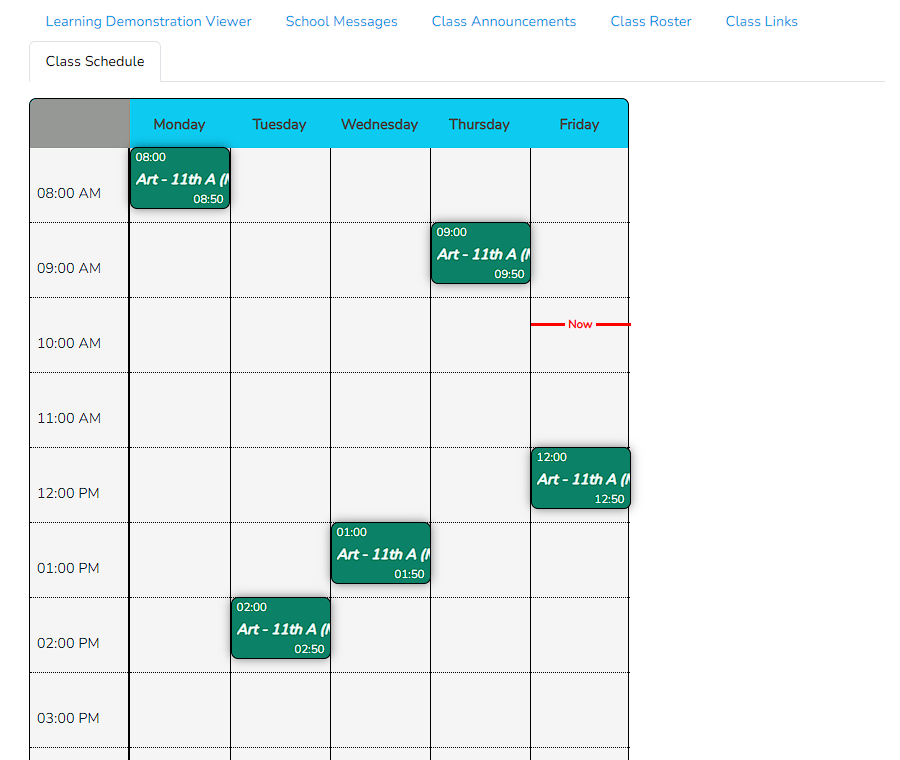
I created what I think is a good, basic class layout. In a regular school, I think this would be taken over by an integration, such as Google Classroom, which I will tackle next. Here are some screenshots of the finished class management page.
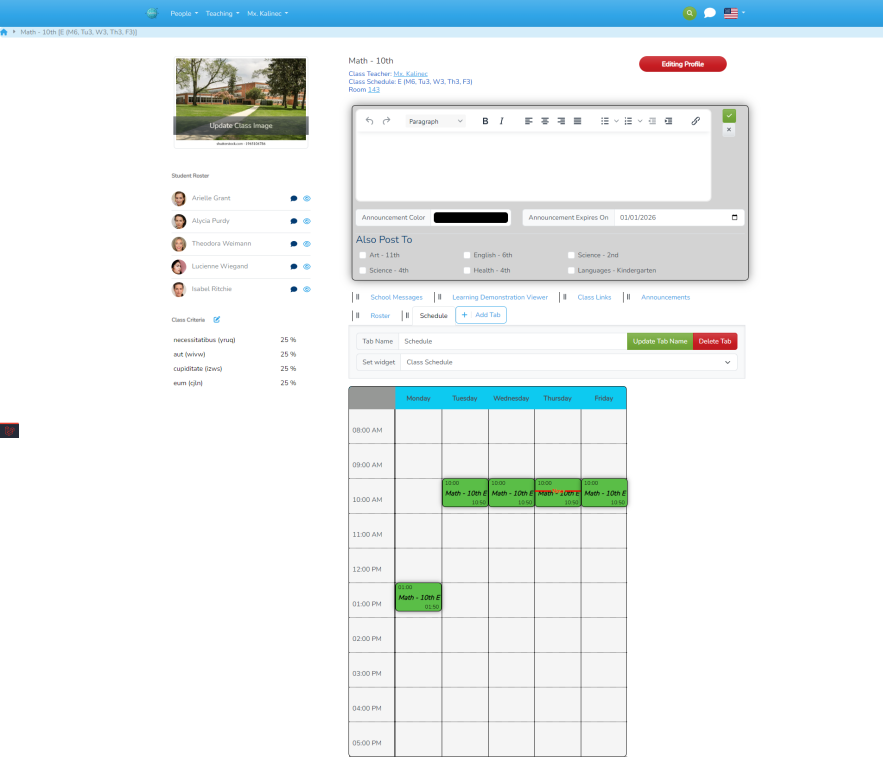
Faculty View | Student View |
 |  |
 |  |
 |  |
 |  |
 | |
 | |
Class Settings
I originally thought that my next step would be the Google Integration, but I ran into two problems:
- Before we could actually manage a class, we need to make sure that certain things are done, like setting up class criteria
- If a teacher has the option of class management, there needs to be a way to select it.
I also realized that there might be other things that need to be setup before the class “goes live” to the students and parents, so I would need a way to edit these “Class Settings” before actually going to the class management page. So I replaced my original “Class Criteria” full page with a set of pages that I call “Class Settings”. The idea is that, from this page, you are able to setup one or all of the teacher's classes from a central location. This page would be a menu option for teachers, and there would be a link from the page management to access it. This “page” would have option to choose a class management service, set up all the class criteria, and have space for the class management to have their own settings as well. To this end, I decided to use another ViewComposer to create a layout for all the settings and all the classes, so they would have a common way to access all the settings for all the classes.
I also use it as a way to complete the class setup. All Class setup can (and should) be done through this single interface that will have all the classes as options, thus allowing teachers to set up all their classes in one place. I also tweaked the class show page to only show if the setup is complete and redirects them to this page to complete their setup. My interface looks like this:
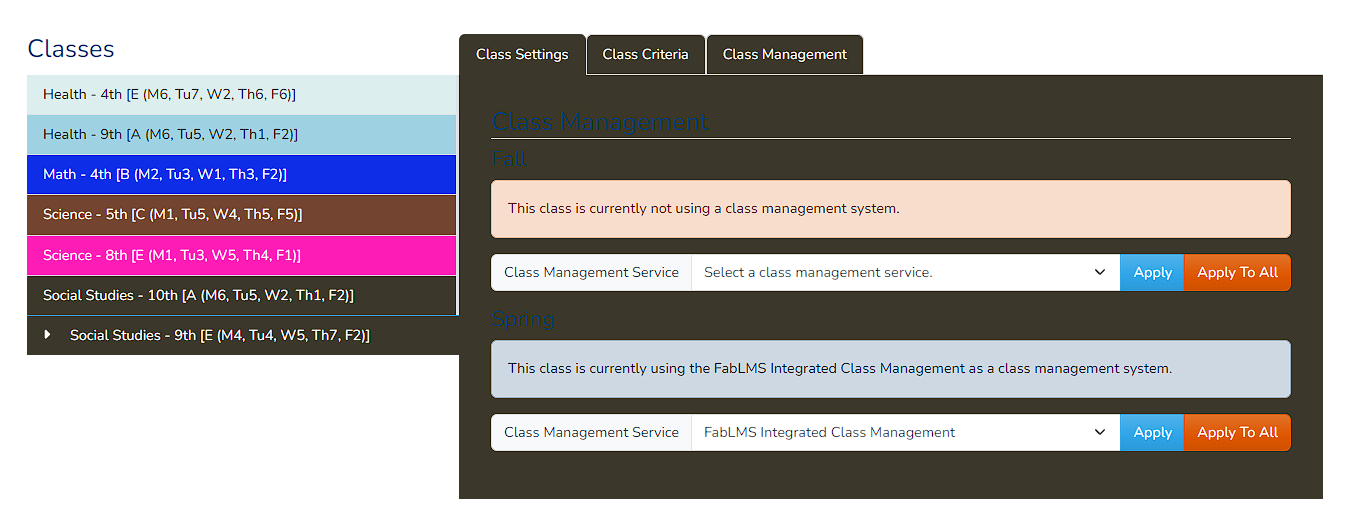
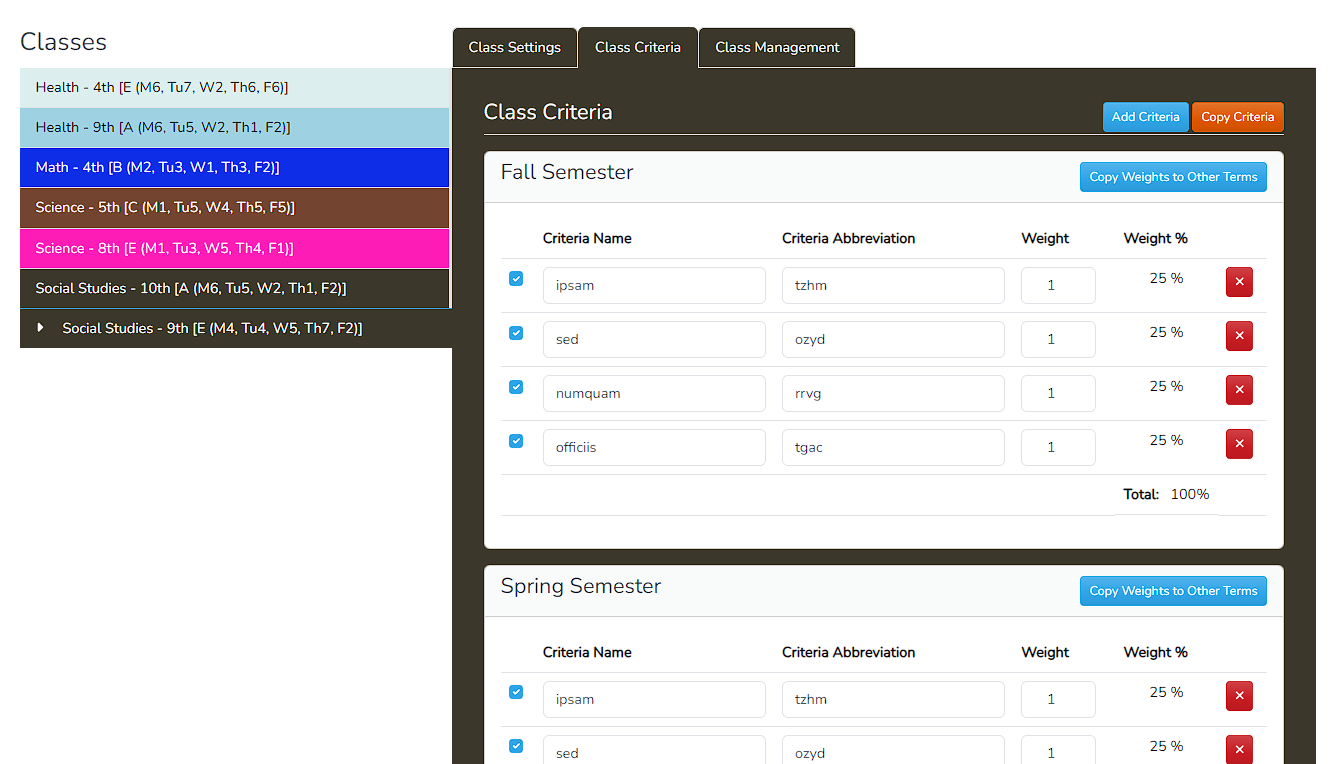
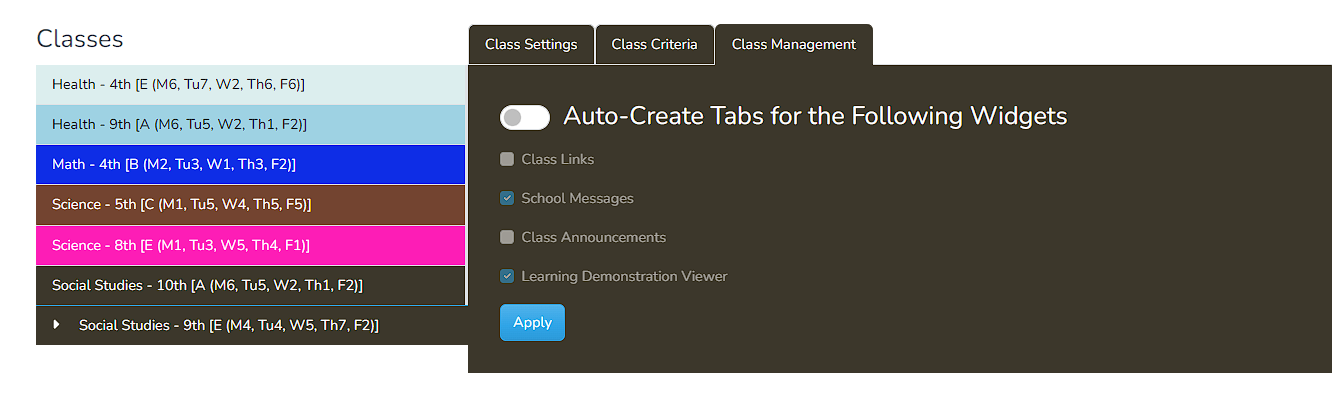
On the left hand side is our color-coded list of classes, which can be accessed by clicking on them. On the right hand side, we have a tabbed interface with, at the moment, three tabs. The first tab is what was discussed earlier; a way to select the class management system if there is a choice. It also allows us to apply to all the classes, not just the current. Changing the management connection WILL reset the setup_done variable for the class, forcing faculty to fill in any missing values. The second tab is our previous Livewire Component that was used to create criteria.
The third tab is actually an optional tab that is defined by the Integrator Class Management Connection. Each Class Connection extends the App\Models\Integrations\Connections\ClassesConnection abstract class which uses three functions to manage the preferences:
/**
	 * @return bool Returns whether this integration connection has preference for the user (teacher) to set.)
	 */
	abstract public function hasPreferences(): bool;

	/**
	 * If the service has preference the teacher can set, this will return the route to the preferences page.  This page
	 * SHOULD extend the layouts.class-settings view, and put the content in between @section('class_settings_content')
	 * parameters.  It should also pass 2 variables:$breadcrumb with the breadcrumbs, and $classSelected which will be the
	 * selected SchoolClass.
	 * @param SchoolClass $schoolClass This is the School Class model for the properties. Note that the preferences should
	 * apply to all the sessions in the class.
	 * @return string
	 */
	abstract public function preferencesRoute(SchoolClass $schoolClass): string;

	/**
	 * This function is called when the class is being managed, but the boolean setup_completed is false.
	 * The class is then assumed to still need to be setup. This function should either do any setup that is needed,
	 * or redirect the user to the setup page.
	 * @param ClassSession $classSession The class session that is being setup.
	 * @return mixed Ths should return a view or a redirect.
	 */
	abstract public function setupClass(ClassSession $classSession): mixed;
Using these 3 functions, an Integrator can then provide the user with some “Class Management” settings. This will be used heavily by Google in order to “link” the classes between FabLMS and Google Classroom. I also created a simple preferences for the Local Classes integrator, which allows a teacher to set the default widgets/tabs in all their classes.
This will pre-populate all the tabs of all the classes when the faculty member sets them up. This also means that I block all class viewing until the teacher themselves goes in and sets up the class. I plan on making these settings “roll over” to every year so teachers will be greeted with the same settings for their classroom year after year and term after term.
Moving to Google?
Now we get to the point of why it took me so long to release this update. My next goal was moving the whole class management to Google. I started, of course, by reading the Google API of classroom to see what exactly I could do. Based on this, there are two ways that I could make the connection:
- A teacher that has a personal account through Google can connect to the service
- This requires the teacher to authenticate through google and ask for oAuth permissions to classroom
- In theory, the teacher could have a local account, register with google, and register with classroom to get this access.
- We should also make it available automatically, not on a per user basis.
- The whole school is already on Google and all teachers are in the teaching group for classroom
- This requires your org to have a service account.
- We should also be able to opt into the local management, if so desired.
I started this by adding a registration link to the classroom service that would add the scope to the list of scopes the user already had and adding the classroom scopes. There are actually multiple scopes that Classroom needs in order to manage everything. Next, I also figured that I could make a global setting the Auth section that allow the system to auto-connect to the google service, so I had the #1 point done. Before moving on to point 2, I decided to alter the Class Settings include support for Google.
My initial goal was simple: either auto-create or manually allow the user to create the classroom in Google then tie it to their existing class. Once that is done, then I would sync the student roster, announcements, etc. I read up on the API's and found an easy way to either create a new classroom, or to get the existing classrooms and then link them to the ClassSession model. Based on this I created the initial class settings view:
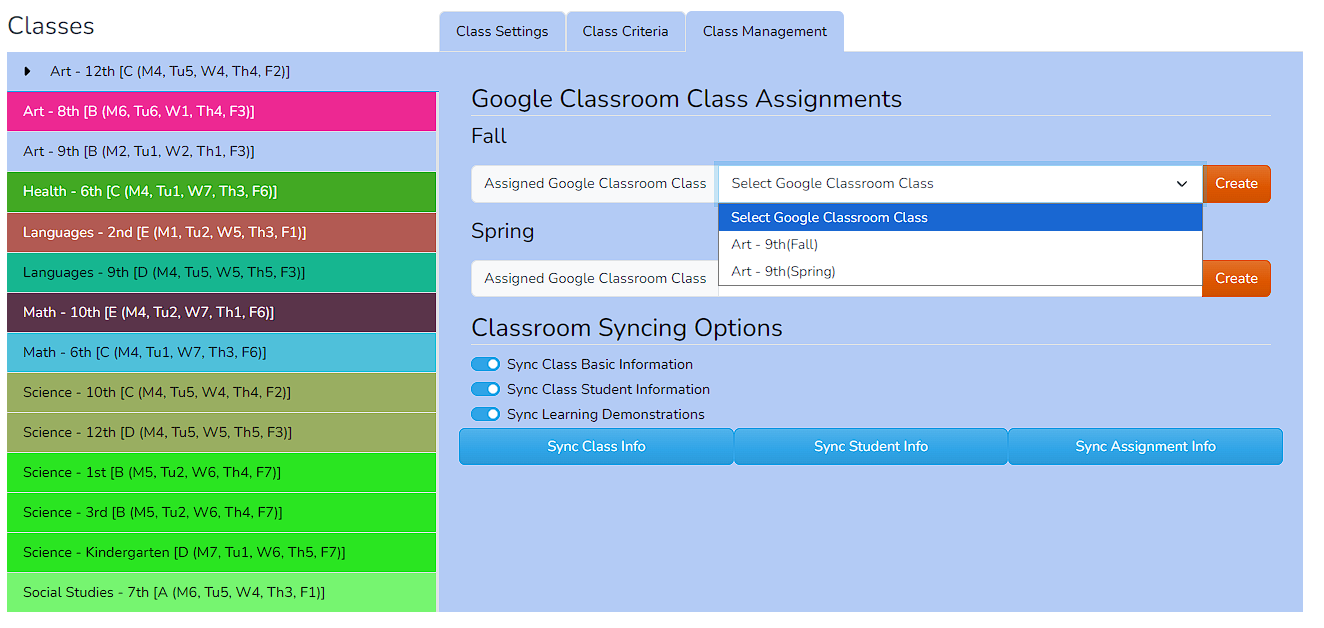
You could either select the class and link them, or click the “Create” button and the system would automatically create a class for that semester and link it to the ClassSession model. I was running high after doing this, as it seemed that tieing the API would be extremely easy. That's when I ran into the big issue. I should probably mention that my code was about 90% done, this was the last feature that I wanted to add. This was done back in December and I was really hoping to release before the end of the year. I've been having this issue since then and it's what pretty much stopped my development for a while.
You see, in order to do the sync and test all the capabilities, each student and instructor in the system needed to have a valid Google account. The fact is I have a very simple Google Workspace subscription that I've been grandfathered in when Google Apps just came out. It's a very cheap system that I pay a small amount and it caps the user at 10 people. I also run these Apps for my family, so all in all, I had about 4 user accounts left. This is not enough to really test the application. Furthermore, I would have to use up all the liceses and set up the whole school in an account that, frankly, was not really meant to be used this way. Sure, I created the faculty and staff account, then connect 2 students? Well, no, it would be 1 student and their parent. This is not something that I can really test, which means that the actual development is hard.
I spend a long time grappling with this.I can't really afford a system with more users, and I can't really work with what I have. I tried finding some sort of pre-made environment, but it doesn't really exists unless you're willing to pay money. I looked into other system that I could integrate instead of Google, but then it would require another composer package, another project and installing the project in a server that is already the cheapest one that I can find. I simply could not find an alternate solution that would fit into my budget and time. AT this point it was the holidays, which distracted me with family obligations, so I struggled with this for weeks.
I decided then to now release the Google integration without the classroom integration. I'm not really losing anything, since the code will include all the work that I've already done. I simply decided to turn off the Google Classroom integration and work on it when/if I had more resources. Instead, I would concentrate on the assessment piece, since that is the center idea in my project.
Annoyance Leads to Testing
Throughout my experience in this, I was either impersonating or logging in in my service accounts and I found a lot of errors in my old code that made it hard to access old features that I built. This was the point that I realized how much I needed a testing suite. Like most programmers, I dreaded the idea of writing test. I don't feel like I have a lot of experience and they boring, repetitive work is frustrating and makes me lose interest fast. But I also knew it had to be done.
I decided to set a small goal for myself and go from there. I created full-test for my permissions and roles, which are not really accessible by the public, only through the main admin account. These views could allow access to my webpage, so it was mainly for me. I then decided to create landing tests, which would test all my landing pages to make sure I could see all the pages that users could land from every role that is accessible to the public accounts. This is when I started using AI to write these test. While it was helpful, I didn't really see a lot of advantage, since it still seemed like I was writing most of the code and a log of debugging.
I did manage to to wire landing page tests for most, if not all, my pages. A lot of these test basically required a fully seeded database, which meant either a re-seed the database or not re-seed, but then I had to have some sort of “dev” database that I could bring back to the original data to run the next test. Seeding the database now takes a long time, as it includes all the skills and rubrics that were created, message history so the chat can be seen as populated, and I also wrote a demonstration seeded to there would be demonstrations that you could edit. These additions made re-seeing the database between test, which made them impossible to work with.
After a lot of research, I decided to create a mysql testing database that my tests could use. I could then create a database in my production server that I could download and use to test against. I implemented this by first creating a testing database with the name “fablms_testing”. I also had to create a new connection that would handle the testing connection. This would be a connection with the same settings as my normal database, but using the testing database instead. Then I added the connection and database name in my phpunit.xml so it would use this instead. I also made an alias in my bash shell:
alias setup_dev='mysqldump --add-drop-table fablms-dev > storage/logs/fablms.sql && mysql fablms_testing < storage/logs/fablms.sql'This would copy my main db to the testing db. then I can run all the tests by executing
php artisan test --testsuite=Feature --stop-on-failureI'm going to end this here so I can finally release this build.