Pivoting to Authentication
and starting to integrate services

I wrote about 5 pages of notes on Implementors then I hit a wall. Since then, I've gotten some help to get my head straight and decided to change my approach. So this is my 2nd draft of this blog post with some other ideas in mind.
First of all, we're dropping the ideas of Integrators, at least for now, and concentrating on the authentication piece itself. Instead of having “packages", we're going to pivot to make it more finely coupled. Why? Because the other way would require each Authenticator to define its own login form, and I really don't want that. Instead, all authenticators will be added as drivers that will take care of the authentication and the authentication data storage, while the login will be done through a Livewire widget. The username, of course, is the email.
Authenticator Drivers
We will be setting up two different authentication drivers, the local driver, which will store all authentication in the database, and Google authentication, since I have a Google Cloud account that I can use to test. I would like to add more, but I'll start with two to get the projects started. The first thing that I did is set up Google Auth in my Cloud Account, and I added the following information to my config/services.php file:
'google' =>
	[
		'client_id'     => env('GOOGLE_CLIENT_ID'),
		'client_secret' => env('GOOGLE_CLIENT_SECRET'),
		'redirect'      => env('APP_URL') . '/auth/google/callback',
	],
I then defined the variables GOOGLE_CLIENT_ID and GOOGLE_CLIENT_SECRET in my .env with the parameters I got when creating the oAuth2 credentials. Notice that I made the redirect static based on the APP_URL, this way I will be able to define different callbacks for each service. Next, I remove the authentication fields in the people table: email_verified_at and password- all of this data will be moved to a space controlled by the auth driver - but I do add a simple varchar field named auth_driver, which will store a text representation of the auth driver. We will keep the remember_token. For now the only options I'll worry about are local and google. I also remove the defaults for the fields in the Person factory and set the auth_driver field to default to local.
Since all authentication will now need to go through the Livewire component, I create the Livewire/Auth/LoginForm component that will handle all the login logic. The reason I would like to use a component is so that I can prompt the user for their email first, so I can then figure out which authentication driver to use. Since we started with the default Laravel Authentication scaffolding, all the controller actions are defined in the vendor folder. We want to move this to our own code, but we will still have to use some of the code provided by the default Laravel scaffolding. Looking at our routes, we only use three authentication routes:
//Auth Routes
Route::get('/login', [LoginController::class, 'showLoginForm'])->name('login');
Route::post('/login', [LoginController::class, 'login']);
Route::post('/logout', [LoginController::class, 'logout'])->name('logout');
These routes are all defined in the App/Http/Controllers/Auth/LoginController which uses the trait Illuminate\Foundation\Auth\AuthenticatesUsers to define all the actions. There are only three functions used in these routes: showLoginForm, login, and logout, so let's look at what they do:
/**
* Show the application's login form.
*
* @return \Illuminate\View\View
*/
public function showLoginForm()
{
return view('auth.login');
}
/**
* Handle a login request to the application.
*
* @param \Illuminate\Http\Request $request
* @return \Illuminate\Http\RedirectResponse|\Illuminate\Http\Response|\Illuminate\Http\JsonResponse
*
* @throws \Illuminate\Validation\ValidationException
*/
public function login(Request $request)
{
$this->validateLogin($request);
// If the class is using the ThrottlesLogins trait, we can automatically throttle
// the login attempts for this application. We'll key this by the username and
// the IP address of the client making these requests into this application.
if (method_exists($this, 'hasTooManyLoginAttempts') &&
$this->hasTooManyLoginAttempts($request)) {
$this->fireLockoutEvent($request);
return $this->sendLockoutResponse($request);
}
if ($this->attemptLogin($request)) {
if ($request->hasSession()) {
$request->session()->put('auth.password_confirmed_at', time());
}
return $this->sendLoginResponse($request);
}
// If the login attempt was unsuccessful we will increment the number of attempts
// to login and redirect the user back to the login form. Of course, when this
// user surpasses their maximum number of attempts they will get locked out.
$this->incrementLoginAttempts($request);
return $this->sendFailedLoginResponse($request);
}
public function logout(Request $request)
{
$this->guard()->logout();
$request->session()->invalidate();
$request->session()->regenerateToken();
if ($response = $this->loggedOut($request)) {
return $response;
}
return $request->wantsJson()
? new JsonResponse([], 204)
: redirect('/');
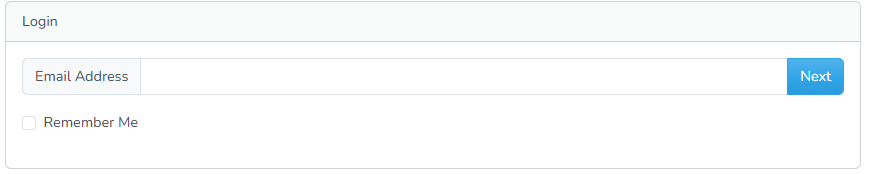
}We will be moving almost all the functionality to the new Livewire component, with the exception of the function showLoginForm, which will now point to the new Livewire component. The main difference in the component will be that, on load, it will only prompt the user for an email and an option to remember them. The remember me functionality will now act as an auto login and as a way for the system to remember your email and fill it in the next time. It will do this through a cookie, that will get set whenever the user submits their email and checks the remember me option.
Once we have an email, we load the user and call the new property auth_driver, which will be mutated into a App/Classes/Auth/Authenticator class. This is where the “driver” part happens. The App/Classes/Auth/Authenticator class is an abstract class that defines all the authenticator methods that are needed for the component to auth a user. Each App/Classes/Auth/Authenticator child will be forced to override the methods (with a few defaults) that will allow the login into the system. The App/Models/People/Person class will then return the correct child class instance of the authenticator that the component can then use to attempt to log the user in. The mapping between the drivers and the App/Classes/Auth/Authenticator child class is defined in the config/auth.php file, which we will be refactoring into something custom for us by adding a new section called ‘drivers’ where we will define the class attached to the driver name. In the future, we might want to add more parameters, so we will make the mappings like this:
/*
    |--------------------------------------------------------------------------
    | Authentication Drivers
    |--------------------------------------------------------------------------
    |
    | Here we define all the different drivers available for authentication. They're
	| keyed by the name of the driver that will be stored in the people table under
	| the auth_driver field.
    |
    */

	'drivers' =>
	[
		'local' =>
		[
			'class' => \App\Classes\Auth\LocalAuthenticator::class,
			//Max number of attempts per lockout_dey before user is locked out.
			'max_attempts' => 5,
			//How long, in minutes, to timeout the user for too many invalid tries
			'lockout_timeout' => 1,
			//Time period that the user must exceed max_attempts before lockout.
			'lockout_decay' => 1,
		],

		'google' =>
		[
			'class' => \App\Classes\Auth\GoogleAuthenticator::class,
			//more fields possible here
		],
	],
As you can see, we put in some throttling information in the settings, to add those features right in. Most of it is already built, we just need to make some changes to how a user logs in. I created an abstract class that all the authenticators have to extend that will define the functions that I need. I'm not sure yet about the number of functions, so some may be trimmed or added. I also created the first child class, the \App\Classes\Auth\LocalAuthenticator class that will be in charge of authenticating people to the local database. It does this by storing the password information in the system settings table with a key of authenticators.local.<person-id>. It will store the following payload:
[
	'password' => null,
	'must_change_password' => false,
	'locked' => false,
	'locked_until' => null,
]
This will give us the ability to lock a user out for a time period or indefinitely and will allow us to flag a user for changing a password. So the login form will first prompt for an email, then load the Person object that the email belongs to. If the person doesn't exist, we throw an error. If the person exists, it loads the authenticator object and determines whether it needs to get a password for the user. Since the local driver requires us to get a password, we show the password form.
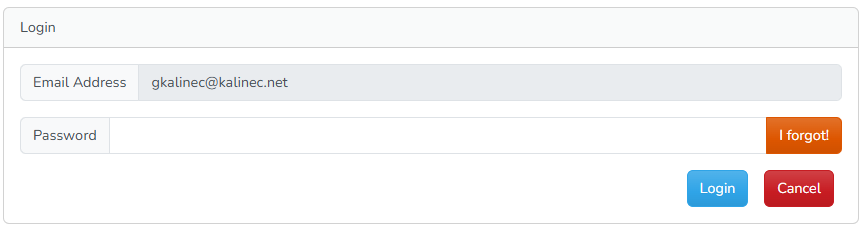
Now, we show the “I Forgot!" button because the local driver allows you to reset your password. Whether or not it is possible is determined by the driver itself. The Google will not have that link (or the password field for that matter), since you can only change passwords through Google's interface. The cancel button will allow us to enter a different email and the login will attempt to authenticate.
But how do we authenticate? Well if you're using the Auth scaffolding you can leverage most of the power of the framework to do your own thing. We're going to continue using the web guard to login, since there's no need for multiple guards at this point. What we don't want to do, is use the guard()→attempt() function to authenticate, tsince that will use it's own login that will require the old database fields to be there. Instead, we write our own attemptLogin() function that will do the instead.
One of the things that I wanted to include in the local driver was the idea of throttling the login attempts to discourage brute-force attacks. It turns out that Laravel already has that built in and can be enabled by using the trait Illuminate\Foundation\Auth\ThrottlesLogins. This trait will basically take care of everything that you need. You do, however, need to have some variables set up:
protected int $maxAttempts = 5;
protected int $decayMinutes = 1;
public function username()
{
	return 'email';
}
These are the only things you need to set up for throttling to work, the rest is injected in the next response and read again from the request. This means that we can use the most important three functions that just make throttling work:
//Clears the login attempts, used when the user is logged in
$this->clearLoginAttempts(request());
//Used when the user typed in the wrong password
$this->incrementLoginAttempts(request());
//Used to check if the user has too many login attempts.
$this->hasTooManyLoginAttempts(request());
We also need to check that the passed password is the same as the hashed password that we have in the database. we do this by using the function Hash::check($plainPassword, $hashedPassword), which will correctly tweak the salt so that the password can be checked. Do not do if(Hash::make($plainPassword) === $hashedPassword) as it will not compare them correctly. Putting all these functions together we can come up with our new attemptLogin function
public function attemptLogin(string $password, bool $rememberMe): bool
{
	if($this->isLocked())
		return false;
	$settings = $this->getPasswordSettings();
	//if the passed password OR the stored password is blank, then you can't login
	if(!$password || !$settings['password'])
		return false;
	//is the password correct?
	if(Hash::check($password, $settings['password']))
	{
		//log the person in
		Auth::guard()->login($this->user, $rememberMe);
		//regenerate the session
		request()->session()->regenerate();
		$this->clearLoginAttempts(request());
		return true;
	}
	//in this case the user did NOT enter the correct password, so we flag it.
	$this->incrementLoginAttempts(request());
	//has there been enough login attempts?
	if($this->hasTooManyLoginAttempts(request()))
		$this->lockUser(true, Carbon::now()->addMinutes(config('auth.drivers.local.lockout_timeout')));
	return false;
}
Do deal with locking the user and authentication errors in the Livewire component. Now, there are still a few features that I wanted to implement, but before I do that, I decided to jump into the Google Authentication side. This authenticator will rely on three main functions: requiresRedirection() which will return true, redirect() which will use the Socialite driver to get the redirect URL to the oAuth, and callback(), which will be called upon authentication. With this, we can now login either as a local user, or authenticated through Google.
Global Authentication
So we now have a good handle on the individual side of things, meaning that we can set up users and key in the database how we would like them to login. What we're missing now is the management piece that will allow us to set up these things globally or individually through the main interface. Before we do things individually though, let's talk about the global authentication. In most schools, the users themselves will have accounts provided by the IT team. This is usually done in a way that so that users can use their Single Sign On (SSO) password to login to all systems. So for most roles we will really using the same authenticator for everyone. There might be some special cases, such as if they want all faculty to login using Microsoft and all the Students logging into Google, but this is not the common way of doing things. We also need to define a “pick-your-own” method of authenticating, since we won't know where their passwords are stored, and they might want to use their “Sign in with Google” credentials.
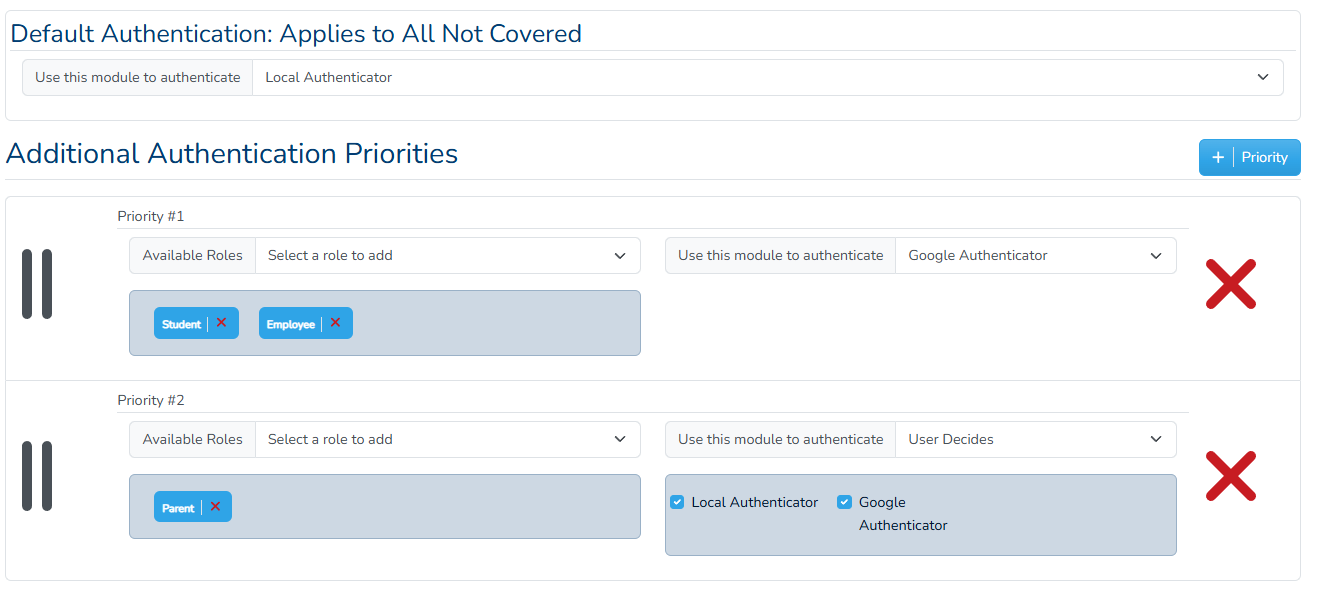
In essence, we will need to be able to force a group of people belonging to a role to authenticate a certain way, or choose their own authentication. We will also need a “default” method for those that are not covered by the Role Permissions. There also need to be some sort of hierarchy to determine how to login. For example, we can define the system as follows:
- Priority #1: Employees, Students. Login with Google
- Priority #2: Parents. Choose whether to login using Google or Local
- Default Priority: Local login only.
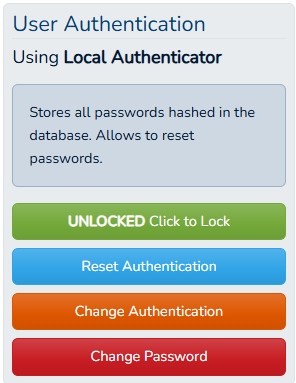
After specifying this, we can then go and edit a single user's account and forcibly change their authentication method, as well as change password (if allowed), lock the user, etc. We will build this interface in the School Settings area, and add a new tab for authentication. We will also add another option to the user's auth_driver field, “inherit”, which will tell all those users to check with the global settings for authentication. The interface looks like this:
But what does it mean to choose your own login, really? Well, there are different ways that you can achieve Single Sign-On (SSO, one provider, like google holds all the passwords), the issue being that there are now MULTIPLE SSO systems, and you have to provide for all of them. It would be much easier if all you had to do was put the button, but alas, it would never work because it would be too easy hack. So, we instead rely on a couple of BIG platforms that we know people will probably have access to (or at least one) on the email that they're providing the school. Now, the reason that adding SSO's suck is you have to pay for whatever providers you want to include as options, as you will need to enter credentials that you can only get by adding this app as a trusted system. There are a couple of ways that I've been researching: oAuth2 and SAML. Based on my understand SALM is really for identifications purposes only. While at first this might seem appealing it has two drawbacks: it is only for logging people into your system, so it might be useful for your own staff/students, but really useless for parents, and it is only to authenticate and not, for example, to access the providers' documents or photos. oAuth does both. Out of both I understand oAuth2 the most and it is also the easiest to implement an a Laravel environment through Socialite.
Socialite currently supports authentication via Facebook, X, LinkedIn, Google, GitHub, GitLab, Bitbucket, and Slack
The best part is that its all done the same way using different drivers and, since oAuth2 parameters are basically the same, you can create all of them out of the box and let the user fill in their own parameters for it in the config/services.php file. With that in mind it's no issue to just create the above drivers as authenticators only. I will later have to rework this to check if I should be asking for more scopes, but we will leave that for later. Now it does suck that we can't use Microsoft, which is useful for office 365, but I also don't really want to pay for the azure connection to test my app. Out of all the other ones I could probably set up a GitHub oauth2 auth, which is nifty, but really silly for a school, even for parents. For parents, the top contenders would be:
- Apple
- Microsoft
- LinkedIn (maybe?)
- Facebook (maybe?)
So Socialite will get us 3/5, not bad. Now remember! in order to actually set these up, you need to have some sort of account where you can publish your LMS at. Or make it multitenant and split the costs. The relevant point though, is that I have no desire to actually get accounts to do these, so I'll be mainly sticking to Google, as I do have an account that I pay for.
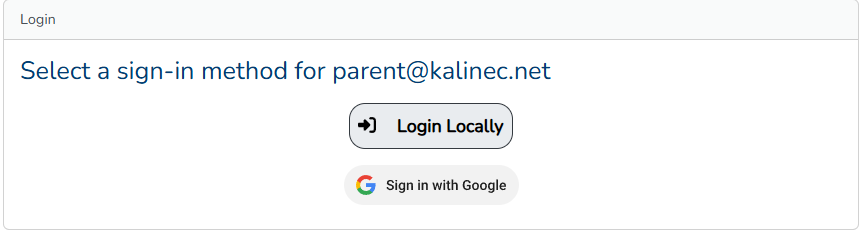
But how do I designate it? First, I changed the auth_driver field to be nullable and to default to null. This then prompts the login form to prompt them how they would like to login. It does this by determining what the options are based on the rules available. It will alternatively decide, if it only fits one option, to save the single option in the person record for faster access and proceed to log you in that way. This also means that when I'm re-applying the authentications settings, all I'm really doing is setting every user's auth_driverto null, thus forcing the login form to determine the login mechanism while still keeping all previous linking information.
The Individual Touch
We now have multiple ways to direct our users to logins, but we might still need to tweak some settings sometimes. What happens if the user selects one method but later decides not to use it? Or how do we reset password? and how do users reset their own passwords? We need an admin way of selecting individual users and changing the login settings for them. The best way to do this would be at the user's profile, since that will be the main way of accessing the user's information. The admin piece is the most complex, which will need a way to do the following:
- Reset the users' authentication: Sets the
auth_drivervariable to null, forcing a re-detection when the user logs in. - Change the user's authentication: Manually set the
auth_drivervariable to whaever you choose. - Lock User: This locks the user out of your system, making it impossible for them to login.
- Reset Password (only if auth supports it): Allows to manually set the password for a user account, long as the auth method supports it.
So I made a widget that can do all of that, ad added it to the user's profile editing.
A foray into service providers
That last one turned out really pretty I though. My thoughts derailed a bit when I started to build the way that a user would change their own password. Which is basiaclly a very similar interface to the way the system should handle passwords resets. Each one uses 2-3 passwords fields that should have their own show passwords, etc, so I should build the each password field as it's own component to try this reusable thing a lot more. Also, the passwords should follow a global password requirements, which should be done in settings. SO I went back to settings to add these, when I noticed that my settings were looking all over the place, so I need to fix the way settings are done and actually also fix the other settings to keep them all in line and be able to add more as I need. This is what started my foray into the service container.
I decided that I needed to document this, so here's my attempt at it. systems settings are grouped into “categories”, which are a single entry in a database that is a key→value database that stores JSON data. This should probably be put into a NoSQL database, which I'm actually thinking about eventually doing; meaning I will keep the parts that I need relational, such as grades or special things, and possibly move the other things into a MongoDB or something. Not yet though!
So each entry into the DB has a key and a JSON array with the relevant settings. For example, the Authentication settings are stored under the key auth and it looks like this:
[
	"min_password_length": 8,
	"min_letters": 2,
	"min_numbers": 2,
	"min_upper": 2,
	"min_symbols": 2,
	"priorities":
		[
			{
				"roles": [],
				"priority": 0,
				"auth_modules": "local"
			},
			{
				"roles": {"2": "Student", "3": "Employee"},
				"priority": 1,
				"auth_modules": "google"
			},
			{
				"roles": {"7": "Parent"},
				"priority": 2,
				"auth_modules": ["local", "google"]
			}
		]
]
Some of that data should actually be instantiated into classes, or contextualized in code in some way. What we do then is create a master SystemSetting class, which extends the Model class to load all the keys we need. The authenticators, for example, use their own area to store the auth information for every user, which will access the SystemSetting directly to add user data. But when talking about the whole setting category, we want to abstract this into a singleton class that we can then inject into different places we might need. We will use the base class to establish the how the data is accessed by each child-class. This is done by extracting the values data (which the database treats is as text only), then convert it into a PHP array and returning the key from the root level. This means that each class should save all of it's data directly to the root, and use accessors and mutators to access the decoded data. We make these two functions as a trait like so:
trait UsesJsonValue
{
	protected function updateValue(string $values, string $key, mixed $value)
	{
		$data = json_decode($values, true);
		$data[$key] = $value;
		return ['value' => json_encode($data)];
	}

	protected function getValue(string $values, string $key, mixed $default = null)
	{
		$data = json_decode($values, true);
		return $data[$key] ?? $default;
	}
}
Using this trait, we can decode all the values in each sub class. We will also need a way to access the instance for each child setting. We do this by declaring a static instance that we can access through a static function. We only have to do this on the parent, then we override the key in the child sub class and the default.
class SystemSetting extends Model
{

	use UsesJsonValue;

	//...table data omitted

    protected function casts(): array
    {
        return [
            'value' => 'array',
        ];
    }

	/**
	 * Instance Variables
	 */

	private static ?SystemSetting $instance = null;
	protected static string $settingKey;

	/**
	 * Instance Functions
	 */
	protected static function defaultValue(): array
	{
		return [];
	}

	public static function instance(): self
	{
		if(static::$instance === null)
			static::$instance = static::find(static::$settingKey);
		if(static::$instance === null)
		{
			//in this case, there's no data, so make an empty space
			$setting = new self();
			$setting->name = static::$settingKey;
			$setting->value = self::defaultValue();
			$setting->save();
			static::$instance = $setting;
		}
		return static::$instance;
	}
}
Now, in the child class we define the key and the default value. But what about their properties? Well, for easy properties, we define a class in the SystemSetting superclass:
protected function basicProperty($propertyName, $defaultProperty): Attribute
	{
		return Attribute::make
		(
			get: fn(mixed $value, array $attributes) =>
				$this->getValue($attributes['value'], $propertyName, $defaultProperty),
			set: fn(mixed $value, array $attributes) =>
				$this->updateValue($attributes['value'], $propertyName, $value),
		);
	}
On the child class, we make every basic property by calling this function. For example, the AuthSettings class will need the min_password_length, min_letters, min_numbers, min_upper and min_symbolsbasic properties. We define them like this:
public function minPasswordLength(): Attribute
{
	return $this->basicProperty('min_password_length');
}
public function minLetters(): Attribute
{
	return $this->basicProperty('min_letters');
}
public function minNumbers(): Attribute
{
	return $this->basicProperty('min_numbers');
}
public function minUpper(): Attribute
{
	return $this->basicProperty('min_upper');
}
public function minSymbols(): Attribute
{
	return $this->basicProperty('min_symbols');
}
We get the defaults from the default array. What about more complicated methods? That's when Laravel's Custom Casting goes into effect. We can create a custom cast and assign it to the settings class, then add it to the cast array.
So I redid all the settings and made them “nicer” in the backend, but what about the service provider? Well, the best part about writing these new setting classes is that I can create a new ServiceProvider, called SystemSettingsProvider, which will only load when one of the settings is actually needed and provides singleton access to each of the settings. It also has the added bonus that it can load my configuration for my password settings for the Laravel's Password Object that will just do all the validation for me. This will be integrated into the PasswordField livewire component.
class SystemSettingsProvider extends ServiceProvider implements DeferrableProvider
{
    /**
     * Register services.
     */
    public function register(): void
    {
        $this->app->singleton(AuthSettings::class, fn(Application $app) => AuthSettings::instance());
	    $this->app->singleton(SchoolSettings::class, fn(Application $app) => SchoolSettings::instance());
	    $this->app->singleton(IdSettings::class, fn(Application $app) => IdSettings::instance());
    }

    /**
     * Bootstrap services.
     */
    public function boot(): void
    {
        Password::defaults(function ()
        {
			$settings = app(AuthSettings::class);
			$req = Password::min($settings->min_password_length)->letters();
			if($settings->numbers)
				$req = $req->numbers();
			if($settings->upper)
				$req = $req->mixedCase();
			if($settings->symbols)
				$req = $req->symbols();
			return $req;
        });
    }

	public function provides(): array
	{
		return [AuthSettings::class, SchoolSettings::class, IdSettings::class];
	}
}
Resetting Passwords & Email Communications
So now I'm working on the password field, which will be a livewire component that will interface with all the settings to make sure that the password meets all the requirements set out by the system. Once that was implemented, I turned my attention to the changing your own password feature, which will be usable whenever the user is logged in. This form will be using the new password livewire component, but will also be the basis for resetting your password when clicking the “I forgot” button.

This form, which is now accessible through the “My Profile” menu option, allows a logged in user to reset the password. It prompts for the current password just in case a bad actor attempts to reset the password through a logged-in session. But we can control this by setting the auth-first variable to false and skipping the authentication. This is useful for the I forgot password link, which is the last part of the login form. Now, the traditional way of doing this is to have the system send an email to the email on file (the email that the user just submitted), with a link. The user follows the link to a page that authenticated the link and allows the user to change the password. Ideally the link should only be available for a limited amount of time.
This method is fine, but it was made for a time where speeds was slower and getting an email could sometimes take 10 minutes. Now, we're expecting the email in seconds or, better yet, an instant text. What I would prefer is to implement SMMS texting out the gate, but that's really hard to do without a way of sending SMMS messages through a real provider, which take not only money but a real purpose to actually get permissions. There's also a bunch of legal hoops you have to jump through just to get this permission and to actually send SMMS. I have done it, in code, before through Twilio, and it was not that hard. The hardest part of the whole thing was to actually get the account approved! I also had to send consent forms to each of the people that I will be contacting, which means building in consent forms.
At this point, I want to keep it easier to communicate (i.e. no SMMS, just email) but do want to build towards the future, so I'll be implementing a hybrid system with an email communication, but expecting quick communication in the front end. What this means is that the user will get sent an email for a code that will a) last for 10 mins and b) get lost if the page is reset. I do this by handling everything directly in the Login Form. Once the I forgot button is clicked, an email (with a tentative fake call to text) will be sent to the user with a 6-digit random code. The component will then put up a 10-min timer for which the code will be saved in the component's memory; If the page is reloaded, this code will be lost.
The user will then enter the 6-digit code in the component. Why 6-digits? it seems to be a popular number for MFA codes, but it will probably be configurable. Once the code is entered, the system will set the new password and log the user in. The other thing is that emails will have to eventually be “customized”, since most schools want some sort of logo or headers/footers on their communications. Which brings up the good point that these emails will have to be customizable by the school. We will still need to make some seeded messages to fill in the emails. How should the messages be stored? In the database as settings entry, of course; probably in the emails.* namespace.
Let's talk about email templates and editors. We know that each email will be stored as a key in the email.* namespace, but what structure elements should we also use? Brainstorming:
- Name: Password Reset Notification.
- Description: This email emails a user in the system information to reset their password. It must contain the
auth_tokenelement in it. - Required Tokens:
[auth_token] - Available Tokens:
[auth_token, recipient_name, recipient_email] - Email Content: This message is used to reset your password. Please use
{{$token}}as your code. - Email Subject: Password Reset
Only the two last element needs to be saved in the database, whereas the first four are really configuration code that needs to be coded on a per-email basis, but it is not really mutable. Based on this, we can create a “setting-like” class that will be in charge of retrieving and saving the email templates. It will store the two fields, subject and content and it will have a way to load a specific email template and a way to get all the available email templates in the system.
Meanwhile, each email implementation will be coded in a class that extends the Mailable superclass. This class will be used to send the actual email. To help make them uniform, I created an interface SchoolEmail and a trait IsSchoolEmail that will define all the things that need to be entered intot the class (via the interface) and to duplicate all boiler plate code (the trait). This will actually be built later, when I build the email editor.
Once the reset password is implemented, the authentication piece is done. The Email Editor needs to be done for editing all the emails, but that will need an actual editor and a way to upload/link files, which is the next step in the integrator.
Looking Ahead
This ends this development cycle. I must say I enjoyed writing while I'm coding, so I will do this again for next blog post. Even though the integrator has been put in semi-hold, I will continue the work by implementing the tie-in to files. I plan on doing this by writing the Email Editor, and possibly some other goodies. I also plan to start developing DiCMS back up as well.
I will update when I'm done.